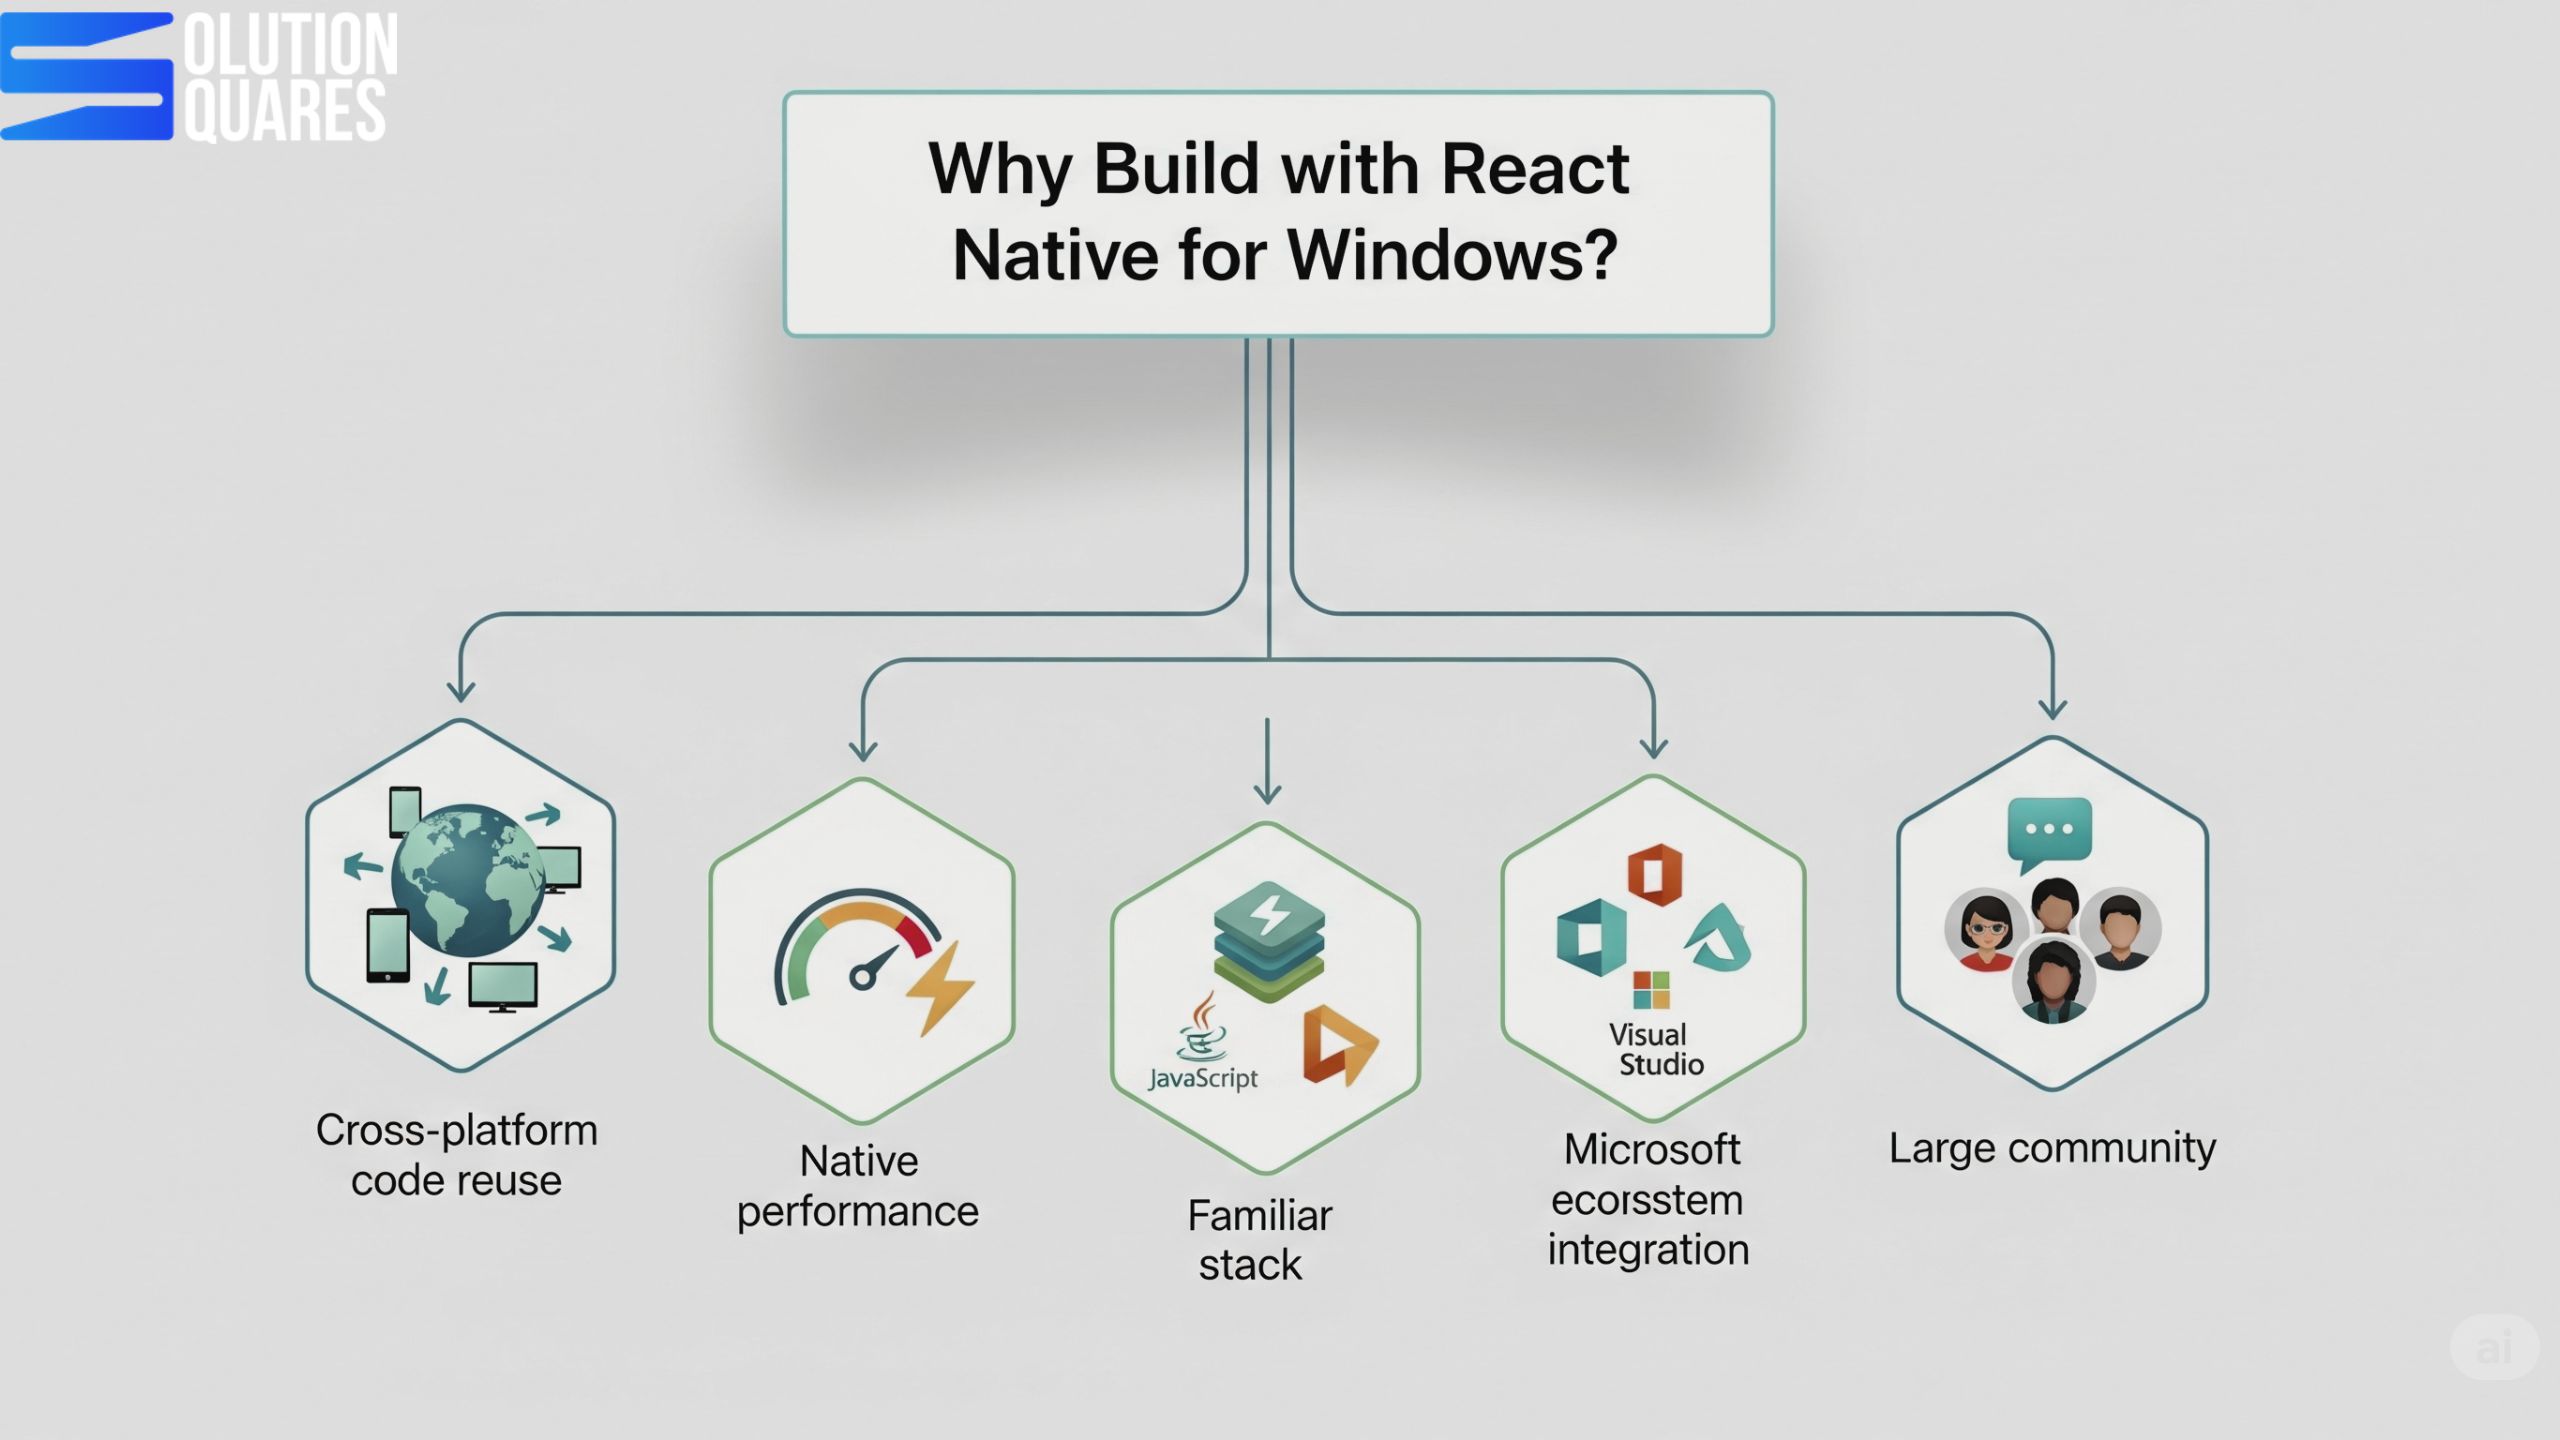
Category: react native app development

React Native Development Services For iOS and android

Our React Native development services help businesses build stunning, high-performance mobile apps that work seamlessly on both iOS and Android. Instead of developing two separate applications, we leverage React Native’s single codebase to create efficient, cost-effective, and powerful solutions.

Why Choose React Native?

React Native is an open-source framework created by Facebook, a global tech leader. Furthermore, It uses the popular JavaScript library React, which web developers already know, to build truly native mobile applications. Moreover,  this means the user interfaces are rendered using platform-specific components, delivering a user experience that’s virtually indistinguishable from an app built with native languages like Swift or Kotlin.

Our React Native Services

We offer a comprehensive suite of services to meet your specific needs:

  •  Custom App Development: We create tailor-made mobile applications from scratch, focusing on your unique business requirements and user goals.
  • API Integration: We seamlessly integrate your app with third-party services and APIs to enhance functionality.
  • UI/UX Design: Our design team crafts intuitive, beautiful interfaces that ensure a smooth and engaging user experience.
  • Maintenance & Support: We provide ongoing support, updates, and maintenance to keep your app running smoothly and securely.
  • Migration Services: We help you migrate existing applications to the React Native framework, modernizing your app and improving its performance.

Indeed, We combine deep technical expertise with a collaborative approach to ensure your project is delivered on time and within budget. Whether you’re a startup looking to launch your first app or an established enterprise aiming to improve your mobile presence, our team is ready to help you achieve your goals. .

  • How To Scale App With React Native For Desktop?

    How To Scale App With React Native For Desktop?

    Key Takeaways

    • Cross-platform Development: Extends React Native from mobile to Windows desktop applications.
    • Code Reusability: Utilise a single codebase across iOS, Android, Web, and Windows.
    • Native Performance: Integrates seamlessly with Windows-specific features for optimal performance.
    • Comprehensive Setup: Requires Windows 10/11, Visual Studio 2022, Node.js, and React Native.
    • Robust Community Support: Backed by Microsoft and an active developer community.
    React Native for Windows marks a significant evolution of the popular React Native framework, extending its capabilities from mobile to include native desktop applications on the Windows platform. 
    Originating as a solution for mobile app development, React Native has grown to support desktop environments, unlocking new opportunities for developers.

    In today’s fast-moving digital world, businesses no longer limit themselves to mobile-first strategies.

    Agencies and enterprises are seeking solutions that extend their applications seamlessly across platforms—including desktops. React Native for Desktop bridges this gap by allowing developers to use the same React Native codebase for Windows, macOS, and beyond.

    For agencies, this isn’t just a technical advantage—it’s a strategic opportunity to deliver scalable, cost-efficient, and user-friendly solutions to clients. For more details, check the official React Native for Windows Documentation.


    desktop development with React native

    Understanding React Native for Desktop

    React Native for desktop allows developers to use JavaScript and React to construct cross-platform applications that perform like native apps on desktop OS, including Windows. This extension of React Native means that applications can now have a single unified codebase for mobile and desktop platforms.

    Key features of react native for Windows include:

    • Native Windows UI components.
    • Access to Windows-specific APIs.
    • Enhanced support for keyboard and mouse inputs.
    • Advanced window management and multi-screen support.

    These distinctions ensure that apps developed with React Native provide a seamless user experience across all devices. Learn more about React Native for Windows.

    Key Features of React Native for Desktop

    1. Native Look & Feel
      React Native for Desktop ensures that apps look and behave like native desktop applications, supporting platform-specific UI elements.

    2. Performance Optimization
      With access to native APIs and modules, agencies can build responsive, high-performing apps for enterprise-grade use.

    3. Scalability
      A shared codebase makes it easier to scale across devices—mobile, web, and desktop—without excessive maintenance.

    4. Rich Ecosystem
      From developer tools to third-party libraries, React Native integrates with existing desktop workflows seamlessly.


    native desktop app with web

    Desktop options & tradeoffs (high level)

    • React Native for Windows + macOS (Microsoft-backed): Native controls, broad device targets (Windows PC, Xbox variants), active docs and GitHub. Great if you want a native desktop app with JS-driven UI. Microsoft GitHub GitHub

    • react-native-macos (Microsoft repo): macOS-specific target — use when macOS parity is required. GitHub

    • React Native Web + Electron / Tauri: Reuse RN Web for desktop wrapped in Electron/Tauri — easier UI reuse from web, but heavier runtime (Electron) or more setup (Tauri). Good if you’re already web-first. Bacancy

    • Alternatives: Flutter Desktop, native (Swift/Kotlin/WinUI) or pure Electron/Tauri, depending on priorities.

    Why Choose React Native for Windows

    Choosing react native for Windows offers several advantages for desktop application development:

    • Code Reusability: Write once and deploy across multiple platforms, including iOS, Android, Web, and Windows.
    • Consistent UI/UX: Ensures a uniform experience across different devices.
    • Native Performance: Integrates deeply with Windows features like system notifications and file system access.
    • Strong Backing by Microsoft: Promises reliable support and updates.

    Explore in detail at RNW Dependencies and React Native for Windows Documentation. For a detailed comparison of React Native with other frameworks, visit React Native vs Flutter 2025.

    Core architecture & what to know

    • JS thread ↔ Native bridge — RN’s runtime still separates JS logic and native UI. Desktop targets expose native UI components mapped from RN primitives.

    • New RN Architecture (Fabric, TurboModules) — improves performance and allows tighter native integration; check platform support for Fabric & Hermes on desktop before enabling. React Native

    • Hermes engine — often recommended for performance and a smaller memory footprint; verify desktop support for your RN version.

    • Native modules — some desktop features (tray, native menus, file dialogues) will require writing/using native modules or leveraging community packages.

    Development workflow & tooling

    • Use VS Code + platform IDE (Visual Studio for Windows, Xcode for macOS) — JS editing in VS Code, debugging native in platform IDE.

    • Use fast refresh for JS changes; rebuild native only when you change native code.

    • Use TypeScript for safer cross-platform APIs and shared code.

    Key Features and Capabilities

    React native for Windows supports essential features like:

    • Native modules for device features access.
    • Fluent Design and WinUI for modern UI designs.
    • Hot-reloading and live-reloading for a dynamic development experience.

    Further, these capabilities make developing applications less time-consuming and more intuitive. Full features are detailed here.

    Comparing React Native for Windows with Other Frameworks

    While frameworks like Electron and Flutter offer alternatives, none integrate as seamlessly with both mobile and desktop platforms as React Native for Windows. Additionally, it strikes a balance between performance and ease of use, ideal for leveraging existing JavaScript and React skills.

    For a comparative analysis, see the React Native for Windows Documentation. Access these resources at React Native for Windows Community Support and the GitHub repository. React Native App GitHub

    Future of React Native for Windows

    The future of React Native for Windows is bright and strategically significant for agencies. Backed heavily by Microsoft, which uses it for products like Office and Xbox, it’s becoming a robust solution for desktop application development.

    Key aspects include:

    • New Architecture (Fabric, TurboModules, JSI): This core rewrite brings near-native performance, smoother UI, and faster communication between JavaScript and native code, crucial for high-quality apps.
    • Universal Platform Expansion: Agencies can now truly leverage a single codebase for mobile, web, and desktop, drastically reducing development costs and accelerating time-to-market for clients.
    • Native Integration: It seamlessly integrates with the Windows App SDK and Fluent UI, ensuring a native look and feel. The “Content Islands” feature allows for modernising existing Windows apps incrementally.
    • Enhanced Developer Experience: Microsoft’s continuous investment in tooling and TypeScript support improves efficiency and code quality.

    For agencies, this means offering cost-effective, high-performance, and consistent cross-platform solutions, allowing them to expand their service offerings to desktop with confidence and maximise their React Native expertise. For more details, visit React Native for Windows Roadmap.


    cross platform react native reality

    Conclusion:

    In conclusion, React Native for Windows offers a powerful, efficient approach to building desktop applications.

    By utilising a unified codebase, developers can streamline their processes and elevate their app development across multiple platforms. Moreover, the ongoing support from Microsoft and the active community reinforce its viability and invite developers to embrace this transformative tool.

    Expand your development horizons by mastering how to run React Native on Windows and start building versatile, high-performance desktop applications today.

    For further exploration, visit React Native for Windows Documentation.

    Frequently Asked Questions

    1. What are the main benefits of using React Native for Windows?

    React Native for Windows offers cross-platform development, code reusability, native performance, and strong support from Microsoft, enabling developers to build efficient desktop applications with a unified codebase.

    2. How does React Native for Windows compare to other frameworks like Electron or Flutter?

    Unlike Electron or Flutter, React Native for Windows integrates seamlessly with both mobile and desktop platforms, leveraging existing JavaScript and React skills while offering a balance between performance and ease of use.

    3. What are the prerequisites for setting up React Native for Windows?

    Prerequisites include Windows 10/11, Visual Studio 2022 with UWP and Desktop C++ workloads, Node.js, Yarn/npm, and the latest version of React Native.

    4. What challenges might developers face when using React Native for Windows?

    Developers may encounter limited API coverage and a less mature ecosystem for native modules. Staying updated with the latest releases and engaging with the community can help mitigate these challenges.

    5. Where can I find support and resources for React Native for Windows?

    Support and resources are available through the official React Native for Windows Documentation, the GitHub repository, and various community forums and tutorials.

  • How to Install React Native App: A Comprehensive Setup Guide

    How to Install React Native App: A Comprehensive Setup Guide


    Key Takeaways

    • React Native allows for cross-platform mobile app development using a single JavaScript codebase.
    • Proper installation requires setting up essential tools like Node.js, React Native CLI or Expo CLI, and development environments for both Android and iOS.
    • Utilizing tools like nvm can help manage Node.js versions efficiently.
    • Common installation issues often involve environment configurations and can be resolved with troubleshooting steps like clearing npm cache.
    • Optimizing your development setup with tools like Visual Studio Code enhances productivity.

    React Native, developed by Meta, is an influential open-source framework utilized for crafting cross-platform mobile applications using JavaScript and React. Its ability to let developers write a unified codebase for both iOS and Android has boosted its popularity among the mobile app development community. Ensuring a proper installation of React Native is crucial for a seamless and productive development experience. This post serves as your thorough guide to install React Native app environments, backed by the most current practices and resources.

    Prerequisites

    System Requirements

    • Windows: Ensure your system is running on Windows 10 or later.
    • macOS: Users should have macOS 11 (Big Sur) or newer for optimal iOS app development.
    • Linux: Android development is feasible on Linux, although it does not support iOS development.

    Learn more about prerequisites.

    Installing Node.js for React Native

    Node.js is vital as the JavaScript runtime needed by React Native to build and execute your app. Follow these steps to install Node.js:

    • Download: Initiate by downloading Node.js from the official Node.js downloads page.
    • Installation on Windows: For Windows users, use a package manager like Chocolatey:
      choco install -y nodejs-lts microsoft-openjdk17

      source

    • Verification: After installation, verify it by typing node -v in your command prompt, which will display your current Node.js version.

      source

    React Native Installation Overview

    Setting up React Native involves several components:

    • Essential tools:
      • Node.js
      • React Native CLI or Expo CLI
      • Android Studio (for Android development)
      • Xcode (for iOS on macOS)
      • Java Development Kit (JDK) (for Android)
    • For beginners, Expo CLI is suggested due to its simplicity, whereas React Native CLI provides more customisationcross platform react native reality options for advanced users.

    Learn more about building React Native apps.

    Additional resources: React Native Environment Setup, React Native Tutorial


    Step-by-Step Setup Guide

    Installing React Native CLI

    You can install the React Native CLI globally using npm with:

    npm install -g react-native-cli

    Verify the installation with:

    react-native --version

    Alternatively, use ‘npx’ to ensure stability and up-to-date functionality without global installs.

    Initializing a New Project

    Using Expo (Recommended for Most Users):

    To create a new Expo project:

    npx create-expo-app@latest --template blank-typescript
    cd <your-project-name>

    Additional resources: Starting React Native Project, React Native Tutorial

    Using React Native CLI (For Advanced Users):

    Start a new React Native project with:

    npx react-native init <ProjectName>

    This initialises the project structure, including App.js/App.tsx, node_modules, and platform-specific directories.

    Setting Up Development Environment

    • Android Setup: Install Android Studio and configure an Android Virtual Device (AVD). Ensure to set ANDROID_HOME environment variable appropriately.

      Learn how to run a React Native app on Android Studio.

    • iOS Setup (macOS Only): Install Xcode from the App Store, set up an iOS simulator, and install Xcode command-line tools:
      xcode-select --install

    Node Setup for React Native

    For stability, use the LTS version of Node.js, such as Node 18+. Using Node Version Managers like nvm for macOS/Linux and nvm-windows for Windows systems can help administer Node.js versions efficiently to avoid compatibility issues. source

    Running the React Native App

    Starting the Development Server:

    • With Expo:
      npm run start
    • With React Native CLI:
      npx react-native start

    Launching the App on Simulators/Emulators:

    • For Expo users, press i for the iOS simulator or a for the Android emulator.
    • For React Native CLI:
      npx react-native run-android
      npx react-native run-ios

    Common Installation Issues and Troubleshooting

    Problems can range from missing dependencies and incorrect environment settings to incompatible versions. Solutions may involve:

    • Clearing npm cache: npm cache clean --force.
    • Deleting node_modules and reinstalling: rm -rf node_modules && npm install.
    • Double-check the environment and dependency conformity to official requirements. source

    Optimising Your Development Setup

    Enhance your workflow with Visual Studio Code equipped with React Native extensions. Persistently update your development tools and manage your code efficiently by configuring absolute paths.

    Learn more about debugging React Native apps.

    React Native application Agency

    Conclusion

    From system requirements to running your application, this guide endeavours to ensure you are well-prepared to dive into React Native app development. Embrace the journey, and take advantage of a meticulously configured development environment for best practices.

    Additional Resources

    For further reading and resources, consult the official React Native documentation and discover more through interactive tutorials on platforms like YouTube. Engage with the community via forums to enhance your learning and troubleshooting skills.

    Additional sources: Starting React Native Project, React Native Tutorial, Node.js Verification Tutorial

    Happy coding!

    Frequently Asked Questions

    1. What are the system requirements for installing React Native?

    Ensure your system is running on Windows 10 or later, macOS 11 (Big Sur) or newer for iOS development, or Linux for Android development.

    2. Should I use React Native CLI or Expo CLI for my project?

    For beginners, Expo CLI is recommended due to its simplicity. React Native CLI is better suited for advanced users who need more customization options.

    3. How can I verify my Node.js installation?

    Open your command prompt and type node -v. It should display your current Node.js version.

    4. What should I do if I encounter installation issues?

    Try clearing the npm cache using npm cache clean --force, delete the node_modules directory and reinstall dependencies with npm install, and ensure all environment variables are set correctly.

    5. How can I manage different Node.js versions?

    Use Node Version Managers like nvm for macOS/Linux or nvm-windows for Windows to efficiently manage and switch between different Node.js versions.

    “`


  • Which is the Best Database for React Native App?

    Which is the Best Database for React Native App?

    Key Takeaways

    • Choosing the right database is essential for optimal performance and user experience in React Native apps.
    • Firebase, Realm, and SQLite are leading database options, each with unique strengths.
    • Firebase offers real-time synchronisation and scalability, suitable for dynamic applications.
    • Realm excels in offline capabilities and high performance for local data storage.
    • SQLite is ideal for structured, file-based data management without real-time requirements.

    Choosing the Best Database for Your React Native App

    Selecting the right database is a critical decision that significantly impacts the performance, scalability, and maintainability of your React Native applications. The database you choose significantly impacts how your app stores and manages data, which in turn affects the app’s functionality, responsiveness, and scalability.

    For agencies building mobile solutions for clients, understanding the various database options and their trade-offs is paramount to delivering successful projects. This guide outlines key considerations and popular database choices to help you make informed decisions.

    Why the Right Database is Crucial for Your React Native App

    Effective data storage in React Native plays a pivotal role in your app’s overall performance and user experience. Choosing the appropriate database can enhance your app’s ability to manage real-time updates, operate offline, and secure user data. Let’s explore how to identify the best databases available for these purposes.

    How to Select a Database?

    Data storage in React Native involves the technologies used to store, retrieve, and manage data. It includes local storage on the device and cloud-based solutions that provide data syncing across platforms. 

    Before diving into specific database technologies, let’s consider the crucial factors that will influence your selection:

    • Data Structure and Relationships: How is your application’s data organised? Does it involve complex relationships, or is it primarily document-based? Relational databases excel at structured data with clear schemas and relationships, while NoSQL databases offer more flexibility for unstructured or semi-structured data.

    • Offline Capabilities: Does your app need to function when the user is offline? If so, you’ll need a database that supports local storage and synchronisation with a remote backend when connectivity is restored.

    • Scalability Requirements: How much data do you anticipate your app will handle, and how many concurrent users will there be? Some databases are better suited for horizontal scaling (distributing data across multiple servers) than others.

    • Performance Needs: What are the performance-critical aspects of your application? Do you need low-latency reads and writes, or is data processing more intensive? Different databases offer varying performance characteristics for different workloads.

    • Development Complexity and Cost: Consider the ease of integration with React Native, the learning curve for your development team, and the hosting and maintenance costs associated with each database option.

    • Security: Ensure the database offers robust security features to protect sensitive user data.

    The right database for your React Native app can help meet these requirements robustly.

    react native database decision

    Popular Database Options for React Native Apps

    Here’s an overview of some of the most common database choices for React Native projects, categorised for clarity:

    Local Databases (for Offline Support)

    • Realm: A mobile database that runs directly on the device. Realm is known for its speed, ease of use, and excellent offline synchronisation capabilities. It supports complex data models and offers strong encryption.

    • SQLite: A widely used, lightweight, and embedded relational database. While powerful, integrating SQLite with React Native often requires third-party libraries and manual schema management.

    • AsyncStorage: A simple, unencrypted key-value store built into React Native. Suitable for storing small amounts of non-relational data but not recommended for complex data or sensitive information.

    Cloud-Based Backend Databases

    • Firebase (Firestore): A NoSQL document database offered by Google Cloud. Firestore is highly scalable, provides real-time data synchronisation, and offers a generous free tier. Its ease of integration with React Native makes it a popular choice.

    • AWS Amplify (DataStore & DynamoDB): AWS Amplify provides a set of tools and services for building mobile and web applications. DataStore offers an abstraction layer with built-in offline capabilities that can sync with the fully managed NoSQL database DynamoDB in the cloud. DynamoDB is highly scalable and performant.

    • Supabase: An open-source alternative to Firebase, offering a PostgreSQL database as a service along with features like real-time subscriptions, authentication, and storage. Supabase provides the power of a relational database with developer-friendly tools.

    • MongoDB Atlas: A fully managed cloud database service for MongoDB, a popular NoSQL document database. MongoDB is known for its flexibility and scalability, making it suitable for applications with evolving data schemas.

    • Other Cloud Providers (e.g., Azure Cosmos DB, Google Cloud SQL/Cloud Spanner): Major cloud platforms offer various managed database services, including both NoSQL and relational options. These can be excellent choices if your client’s infrastructure is already tied to a specific cloud provider.

    Making the Right Choice for Your Client’s Project

    The “best” database ultimately depends on the specific requirements of your client’s React Native application. Consider the following questions during your decision-making process:

    • What are the core functionalities of the app and how will data be used?

    • Is robust offline support a critical requirement?

    • What are the anticipated data volume and user growth projections?

    • Does the project have specific security or compliance needs?

    • What is the development team’s familiarity and expertise with different database technologies?

    • What is the client’s budget for hosting and maintenance?

    By carefully evaluating these factors, your agency can select a database that aligns with the project’s technical needs and business objectives, ensuring a performant, scalable, and maintainable React Native application.

    Ready to Build Powerful React Native Apps?

    Contact us today for a free consultation to discuss the best database strategy for your next React Native project! We have the expertise to guide you in choosing and implementing the optimal solution to meet your client’s needs and deliver exceptional mobile experiences.

    Firebase vs. Realm: A Detailed Comparison

    Firebase:

    • Overview: A comprehensive Backend-as-a-Service that offers more than just a database. Its real-time capabilities and cloud services make it a versatile choice for apps that require constant data syncing.
    • Key Features: Seamless real-time sync, offline support, and robust security rules.
    • Pros: Streamlines application development with extensive support and automatic scaling.
    • Cons: May get expensive as scalability needs grow; not optimised for local-only data storage.

    Realm:

    • Overview: Realm is optimised for local storage, offering excellent data management and synchronisation services through Realm Sync.
    • Features/Benefits: Real-time automatic updates, strong offline capabilities, and data encryption.
    • Pros: High performance and great for complex, offline-first applications.
    • Cons: Cost associated with Realm Sync and less straightforward cloud integration.

    Comparative Analysis: Firebase vs. Realm

    Feature Firebase Realm
    Real-time sync Excellent Good with Realm Sync
    Offline support Yes Exceptional
    Security Strong rule-based security Robust encryption offered
    Scalability High scalability in the cloud Primarily local scalability
    Integration Easy integration Requires initial setup for sync

    SQLite for React Native

    SQLite offers a reliable choice for those who need a lightweight, file-based system for structured data. It provides full SQL capabilities and is suitable for applications without the need for cloud-backed features. Its major advantage is operating independently from network connectivity, making it an excellent option for devices with frequent or prolonged offline periods.

    Factors to Consider When Choosing a Database

    Deciding on a database often depends on several factors:

    • Project Scalability: Cloud databases like Firebase are advantageous for growing applications due to their backend scalability. In contrast, Realm and SQLite are constrained by local storage limits.
    • Development Team Expertise: Your team’s familiarity with database management can determine the best choice, whether cloud-based or local solutions.
    • Budget: Costs can vary significantly between databases, especially when considering cloud services versus local storage solutions.

    react native app perfomance increace

    Conclusion: Making the Right Choice

    Choosing the right database for your React Native app involves balancing various factors, including functionality, scalability, cost, and development preferences. Each database offers unique advantages that may suit different types of projects:

    • Firebase is ideal for dynamic, collaborative applications requiring real-time data.
    • Realm shines in apps where performance and offline access are critical.
    • SQLite excels at straightforward data management tasks with its robust SQL support.

    Before making a decision, assess your specific requirements and consult detailed documentation and resources to understand the best practices for implementing your chosen database. [Learn More]

    Further Reading and Resources

    • Official Documentation: Explore detailed guides and API documentation provided by Firebase, Realm, and SQLite.
    • Tutorials and Integration Guides: Check platforms like Back4App and RxDB for practical, hands-on integration advice. [Explore]

    Frequently Asked Questions

    1. What is the difference between a local and a cloud database for a React Native app?

    A local database is an embedded database that stores data directly on the user’s device. This is crucial for enabling offline functionality, as it allows the app to work even without an internet connection. A cloud database, on the other hand, stores data on remote servers. It provides the main data repository for your application, enabling synchronisation across multiple devices and users.

    2. Why would a mobile app need a local database?

    A local database is essential for any app that needs to function reliably without an internet connection. It provides offline access to data, improves the app’s responsiveness by reducing network latency, and helps maintain a smooth user experience even in areas with poor connectivity.

    3. What is the main difference between SQL and NoSQL databases? Which one should I choose for my project?

    SQL (Relational) databases, like PostgreSQL, use structured tables with predefined schemas and are ideal for applications with complex data relationships and a need for data integrity.

    NoSQL (Non-Relational) databases, like Firestore or MongoDB, are schema-less and store data in flexible formats (e.g., documents, key-value pairs). They are better suited for large-scale applications with unstructured data and high scalability requirements. The “best” choice depends on your project’s specific data structure and scalability needs.

    4. Can a single database handle both offline data and cloud synchronisation?

    Yes, some database solutions like Realm and AWS Amplify’s DataStore are designed to handle both local storage and seamless cloud synchronisation. They automate the process of syncing data between the local database on the device and the cloud backend, greatly simplifying development.

    5. How do databases like Firebase and Supabase differ?

    Both Firebase and Supabase provide a suite of backend services, including a database, authentication, and file storage. The main difference lies in their database technology:

    • Firebase (Firestore) is a NoSQL document database, known for its real-time capabilities and ease of use.

    • Supabase is an open-source alternative built on a PostgreSQL (SQL) database, offering the benefits of a relational database with a similar real-time functionality. The choice often comes down to your preference for a SQL or NoSQL data model.

    6. Does the choice of database affect the performance of my React Native app?

    Yes, absolutely. The database choice can significantly impact app performance, particularly for data-intensive applications. A poorly chosen database can lead to slow load times, UI lag, and increased battery consumption. Factors like query efficiency, data indexing, and the database’s ability to handle concurrent reads and writes all play a role in the overall performance of your app.

  • How To Power React Native without Expo?

    How To Power React Native without Expo?

    Key Takeaways

    • React Native enables cross-platform mobile app development using JavaScript and React.
    • Choosing React Native without Expo offers greater flexibility and control over native code.
    • Setting up a bare React Native project involves configuring native environments for iOS and Android.
    • Understanding the differences between React Native CLI and Expo CLI is crucial for project setup.
    • Migrating from Expo to bare React Native requires careful planning and execution.
    • Adhering to best practices ensures efficient development and maintenance of React Native applications.

    Harness the Power of React Native without Expo: A Comprehensive Guide

    Overview of React Native

    React Native has revolutionised the mobile app development landscape by allowing developers to build cross-platform apps using React and JavaScript. This technology is favoured by industry giants like Meta, Microsoft, and Shopify, who leverage it for shared codebases and swift iteration cycles. By utilising React Native, companies can maintain a single codebase while deploying to both iOS and Android platforms.

    Developing React Native applications without Expo, often referred to as the bare workflow, is a professional approach that offers greater flexibility and control over your project. This is the preferred method for agencies and clients who require deep customisation, access to specific native features, and direct control over the build process.

    In this guide, our primary focus is on React Native without Expo. Opting for this approach gives developers maximum control over native code and build configurations, essential for tailor-made solutions in complex projects.

    Alternatives to Expo

    For developers seeking enhanced customisation, alternatives to Expo include the React Native CLI for a purely bare setup and Expo’s Bare Workflow for a semi-managed environment. These options offer varying degrees of control over the development environment (ShiftAsia, Godel Technologies).

    Understanding React Native and Expo

    What is React Native?

    React Native is a framework designed for building native apps using JavaScript. This technology bridges the gap between web development and mobile app platforms like iOS and Android, facilitating the creation of UI components with a single codebase (Godel Technologies).

    Introduction to Expo

    Expo provides an open-source platform layered atop React Native, enhancing the development process with a streamlined setup and a rich set of integrated services and SDKs. The Managed workflow simplifies the initial setup, allowing for rapid development cycles and easy implementation of features such as push notifications and OTA updates (Utilities Online, Godel Technologies, Dev.to).

    Comparison Between Expo and Bare React Native

    • Expo Managed Workflow: Offers ease of use with minimal setup requirements, ideal for faster project onboarding. However, it limits customisation of native modules unless opting for Development Builds or ejecting (Utilities Online, Dev.to).
    • Bare React Native (No Expo): Provides full access to the native project environment, allowing for extensive customisation and optimal performance tuning. Although it involves higher complexity in setup and maintenance, it offers unparalleled flexibility (ShiftAsia, Godel Technologies).
    • Hybrid Approach: Utilising Expo Development Builds can integrate custom native modules while retaining many benefits of the Expo ecosystem (ShiftAsia).

    Reasons to Choose React Native without Expo

    While Expo’s managed workflow is excellent for rapid prototyping and simple apps, it abstracts away native code and can become a limitation for complex projects. Opting for the React Native CLI (the bare workflow) provides several key benefits:

    • Full Native Control: You have direct access to the android/ and ios/ folders, allowing you to modify native code, add custom native modules, and integrate third-party libraries that are not supported by Expo.

    • Customisation: Agencies can implement highly customised features, fine-tune performance, and configure every aspect of the build pipeline, from code signing to app flavours.

    • Reduced App Size: Because you only include the native dependencies your app needs, the final binary size can be significantly smaller compared to Expo’s managed workflow, which includes a large number of pre-built APIs.

    • CI/CD Integration: The bare workflow is more straightforward to integrate with robust Continuous Integration/Continuous Deployment (CI/CD) pipelines using tools like Fastlane or Bitrise.

    • Greater Flexibility: Developers can directly modify Xcode and Gradle settings, incorporate custom native code, and customise build pipelines to meet specific enterprise needs. This level of control is crucial for projects with unique performance and security requirements.

    • Performance Optimisations for Complex Applications: Optimise performance by customising the Hermes engine settings, employing ProGuard/R8 optimisations, and selectively including libraries to reduce the app size and improve startup time.

    • Avoiding Expo’s Limitations and Dependencies: Operating without Expo eliminates dependencies on the Expo SDK release cycles and managed services, providing autonomy over when and how to update the application framework and integrate new features .

    react native without expo advantage

    Setting Up Bare React Native

    Definition

    A bare React Native setup mirrors a traditional native development environment, using the React Native CLI, Android Studio, and Xcode to manage platform-specific projects. This setup bypasses Expo’s managed environment, offering developers complete control over the native configurations.

    Step-by-Step Guide to Initialising a Bare React Native Project

    1. Prerequisites Installation: Install critical development tools like Node.js (LTS version), Watchman (for macOS users), and Java 17 for Android development. Set up Android Studio SDKs and configure the Android environment, along with Xcode and CocoaPods for iOS development. Make sure Android emulators or iOS Simulator are enabled for testing. Learn more.
    2. Create the Project: Use the command: npx react-native@latest init MyApp --template react-native-template-typescript.
    3. iOS Setup: Navigate to the iOS directorycd ios && pod install && cd .., then open ios/MyApp.xcworkspace In Xcode to configure the app’s signing and schemes.
    4. Android Setup: Ensure ANDROID_HOME that the Java toolchain is correctly configured. Open the android/ folder in Android Studio to synchronise the Gradle settings.
    5. Running the Application: Launch the app on iOSnpx react-native run-ios, or on Android with npx react-native run-android.

    Project Structure Tips

    Create a A A src directory to house the application code, organising it into feature modules. Isolate native code in the ios/ and android/ directories. Centralise environment variables with tools like react-native-config and ensure that secrets are stored securely outside the source code.

    Managing Native Code and Integrations

    Opt for libraries that support autolinking and follow best practices for TurboModules and the new React Native architecture when developing custom modules. Utilise CocoaPods post_install hooks and adjust Gradle build types/flavours for managing different build environments. Document all integration steps in the project’s README to minimise dependencies on individual developers’ expertise.

    React Native CLI Setup

    Introduction to React Native CLI

    The React Native CLI is a command-line utility that lays the foundation for React Native projects, interfacing directly with Metro bundler and native build tools, providing a streamlined workflow without the need for Expo’s abstraction.

    Installation and Configuration

    Initialise React Native projects using the npx command, which avoids the need for global installations and ensures the use of the latest version available: npx react-native@latest init .... Set up development environments by configuring Android Studio SDKs, enabling emulators, and preparing the Gradle JDK. On macOS, install CocoaPods and manage Xcode signing settings to complete the iOS configuration.

    Differences Between React Native CLI Setup and Expo CLI

    • Expo CLI/Managed Workflow: Expo CLI requires minimal native setup and offers instant testing capabilities on physical devices via Expo Go. However, it imposes constraints on SDK customisation and native module integration.
    • React Native CLI: Allows extensive control over native modules and configurations, requiring manual setup of development toolchains. Unlike with Expo Go, building and testing native changes are necessary, though this provides unlimited access to native functionalities.

    Common Commands and Workflows

    • Starting the Metro Bundler: npx react-native start
    • Launching Applications:
      • On iOS: npx react-native run-ios
      • On Android: npx react-native run-android
    • Linking Dependencies: Autolinking simplifies the process, but manual execution of pod install For iOS or a Gradle synchronisation for Android may be necessary when adding new libraries.
    • Releasing Applications: Utilise native build pipelines such as Xcode Archive/TestFlight for iOS and Gradle Assemble/Upload for Android. Integration of continuous integration tools like Fastlane or GitHub Actions can automate builds and deployments, further streamlining the release process.

    Migrating from Expo to Bare React Native

    Considerations Before Migrating

    Before moving away from Expo, inventory all uses of the Expo SDK and assess the feasibility of replacing them with native or other third-party alternatives. Evaluate whether Expo Development Builds, which allow some custom native integration, might meet the needs of your project without fully migrating. Additionally, plan for the infrastructure and processes required for building, signing, and deploying apps previously managed by Expo’s EAS services.

    Step-by-Step Migration Process

    1. Audit Dependencies: Catalogue all expo-* packages, configuration plugins, and instances where Expo APIs are employed.
    2. Choose a Migration Path:
      • Hybrid Approach: If retaining some Expo benefits is desirable, consider using Expo Development Builds with added custom native modules.
      • Full Migration to Bare React Native: If complete independence from Expo is preferred, eject from the managed workflow or transition to a bare setup, removing all Expo-specific packages and configurations.
    3. Initialising a Bare Project or Ejecting: Start a new React Native project using the CLI and gradually move existing code over, or utilise Expo’s tools to help transition from a managed to a bare workflow. Adjust configuration files such as app.json or app.config.js to their native counterparts, Info.plist for iOS and AndroidManifest.xml for Android.
    4. Replace Expo APIs: Identify suitable replacements for Expo APIs, such as using react-native-permissions for permissions management, react-native-push-notification or Firebase for notifications, react-native-image-picker for media selection, and react-native-geolocation-service for location services. Further, native modules may also be developed to fulfil specific functionalities not covered by existing libraries.
    5. Configure Native Projects:
      • iOS: Manage CocoaPod dependencies, set up necessary app capabilities like background modes and notifications, and configure signing certificates.
      • Android: Adjust Gradle dependencies, set permissions in AndroidManifest.xml, and integrate necessary Kotlin or Java modules.
    6. Validating Builds: Thoroughly test the application on physical devices and emulators to ensure stability and functionality. Additionally, set up continuous integration and deployment pipelines to automate build and release processes, and prepare app store assets and signing credentials for submission.

    Post-Migration Handling

    To maintain consistency and stability post-migration, lock down versions of dependencies in Podfile.lock and use Gradle version catalogues. Document all steps required for manual integration to reduce reliance on specific team members’ knowledge and expertise.

    Troubleshooting Common Issues

    • Build Failures: Align versions of React Native, the Hermes engine, Android Gradle Plugin, and Xcode to resolve issues related to SDK version mismatches. Troubleshoot CocoaPods or Java version discrepancies to address build errors.
    • Missing Permissions or Credentials: After removing dependencies on Expo, explicitly configure Info.plist on iOS and AndroidManifest.xml on Android to include required permissions and app entitlements.
    • Autolinking Gaps: Double-check Podspec files and Gradle configurations for any mismatches, and run pod install or clean project caches to fix linking issues.

    Best Practices for Developing React Native without Expo

    Managing Dependencies and Updates

    Stay informed about updates to React Native by regularly reviewing official release notes. Test new versions and major changes on separate branches to ensure compatibility with existing code before merging into the main project. Opt for stable, well-maintained libraries and pin versions to avoid unexpected updates. Use tools like Renovate or Dependabot to automate dependency management and keep your project current with minimal manual intervention. Discover more.

    Performance Optimization

    Enable the Hermes JavaScript engine to enhance performance and reduce the size of your application. As Fabric and TurboModules reach stable release phases within the React Native ecosystem, start integrating them into your projects to leverage their performance improvements. Split your JavaScript bundle to load code asynchronously and lazily load screens that are not critical to the initial user experience. Memoise resource-heavy components to prevent unnecessary re-renders and keep your app responsive. Learn how.

    Ensuring Cross-Platform Compatibility

    Conduct frequent tests on both iOS and Android platforms to catch and fix platform-specific issues early. Adjust app designs to follow platform-specific guidelines where appropriate to maintain a native look and feel. Implement feature flags judiciously to manage experimental features and use platform-specific file extensions (such as .ios.tsx or .android.tsxto organise code that diverges across platforms.

    react native without expo developer

    Utilising Community Resources and Libraries

    Engage with the broader React Native community by attending conferences, participating in forums, and contributing to open-source projects. Take advantage of established libraries like React Navigation for routing, Reanimated for complex animations, and React Native Gesture Handler for touch interactions. Regularly compare the benefits and drawbacks of using Expo versus bare React Native setups to stay informed about the best tools and practices for your specific project needs.

    Encouragement for Developers

    Every app development project has unique requirements that may benefit from different aspects of the React Native ecosystem. We encourage developers to begin with a capability matrix to assess the features and integrations that are crucial for their app. Depending on the level of customisation and control needed, either a fully bare setup or a hybrid approach using Expo Development Builds may provide the optimal path forward.

    Whatever choice you make, React Native offers a flexible and powerful framework for building high-quality, native apps. As the ecosystem continues to evolve, keep exploring new tools and techniques that can enhance your app’s performance, maintainability, and user experience.

    Additional Resources

    For further reading and more detailed guides on both bare React Native setups and using Expo tools, please refer to the following resources:

    By staying engaged with both the documentation and the community, developers can keep their skills sharp and their projects aligned with the latest best practices in React Native development. Whether you choose to work with Expo or without it, the wealth of resources available ensures you have the support needed to build exceptional mobile applications.

    Conclusion

    Choosing between React Native with or without Expo involves weighing the balance of ease of use against the need for direct control over the native environment. While Expo offers a streamlined, managed experience with quick setup and easy updates, a bare React setup provides complete freedom to integrate any native module, customise build configurations, and optimise the app to the finest detail.

    As you consider your project’s requirements, team skills, and timeline, use this guide to evaluate the best approach for your app development process. By understanding the trade-offs and exploring the options available, you can make an informed decision that aligns with your goals and resources.

    Frequently Asked Questions

    1. What is the biggest challenge of the bare workflow?

    The biggest challenge is setting up and maintaining the native development environment. This requires expertise in native Android and iOS development, as well as manual management of dependencies and build configurations.

    2. How does the bare workflow affect the development timeline?

    While the initial setup might take longer compared to Expo’s managed workflow, the bare workflow can save time in the long run for complex projects. You avoid the limitations of Expo and can implement advanced features without having to “eject” from the managed workflow, which can be a complex and time-consuming process.

    3. Can we use any third-party library with the bare workflow?

    Yes. The bare workflow is the only way to access and integrate with all the native libraries available for React Native. Unlike Expo’s managed workflow, which has a curated list of supported APIs, the bare workflow gives you the freedom to choose any library that meets your project’s needs.

    3. Should I choose native or hybrid app development?

    If performance and access to device-specific features are critical, native development is preferable. If budget and development speed are priorities, hybrid development may be suitable.

    4. What are some cost-saving strategies for app development?

    Prioritising features for an MVP, utilising cross-platform development, and outsourcing to cost-effective regions are effective strategies to manage costs.

    5. Why is ongoing maintenance important for my app?

    Regular maintenance ensures your app remains competitive, secure, and compatible with the latest devices and operating systems.

    react native without expo developer
  • Build React Native for macOS Without Limit

    Build React Native for macOS Without Limit

    Key Takeaways

    • React Native for macOS and Windows expands the versatility of React Native beyond mobile platforms.
    • Developers can maintain a single codebase for web, iOS, Android, and desktop applications, enhancing efficiency.
    • React Native Official provide extensive resources for desktop development.
    • Key advantages include native performance, access to platform-specific features, and seamless ecosystem integration.
    • Future developments like the Fabric architecture promise improved UI performance across platforms.

    Unlocking Desktop Potential: React Native for macOS and Windows

    Introduction

    React Native for macOS is revolutionising desktop application development by extending the powerful capabilities of React Native beyond mobile platforms. As a leading JavaScript framework originally designed for mobile app development, React Native’s expansion into the desktop sphere encompasses both macOS and Windows, catering to a growing interest in writing versatile applications that run across multiple platforms.

    As the digital landscape evolves, the demand for high-quality desktop applications is making a resurgence. For agencies and clients with an existing React Native mobile presence, extending your application to the macOS desktop offers a powerful way to expand your user base and deliver a seamless cross-platform experience. By leveraging React Native for macOS, you can empower your team to build a native macOS app from your existing codebase, providing a truly unified solution.

    Furthermore, it adheres to the “learn once, write anywhere” principle, allowing developers familiar with React and React Native to expand into desktop development without needing to switch languages or tooling.

    Overview of React Native for Desktop Development

    The journey from mobile to desktop application development with React Native has been facilitated by community projects and significant contributions from corporations like Microsoft, making it possible to maintain a single codebase for web, iOS, Android, and now desktop platforms. Moreover, this strategic move considerably boosts development efficiency and broadens the scope of applications developers can build.

    The Power of Native Desktop

    React Native for macOS and Windows is not a web-based solution. These frameworks compile your JavaScript code into real, native applications that run on the operating system. This is the key to delivering a superior user experience with seamless performance and a truly native look and feel.

    React Native for Windows

    • Official Support: Backed by Microsoft, this framework offers deep integration with the Windows ecosystem. It provides direct access to platform-specific APIs and is well-documented and maintained.
    • Performance: It utilises DirectComposition for rendering, which provides direct access to the GPU, making it excellent for high-performance and visually-intensive applications.
    • Scalability: The official support makes it highly scalable for enterprise-level applications that need to integrate with a wide array of Windows-specific services.

    React Native for macOS

    The react native macOS library specifically adapts React Native for the macOS environment, bringing typical React components and the JavaScript framework into the native macOS application domain. Additionally, this integration allows access to macOS-specific UI controls and features directly from JavaScript.

    • Native Look and Feel: This framework uses Apple’s native AppKit UI components. Your application will look and feel just like a traditional macOS app, ensuring a consistent user experience.
    • Code Reusability: It allows you to share a substantial amount of your business logic and code between your iOS and macOS applications, accelerating development and reducing maintenance overhead.
    • Ecosystem: As a community-driven project, it has a robust and active community, with a growing ecosystem of tools and libraries.

    react native without expo developer

    Why Choose React Native for macOS?

    React Native for macOS is a community-driven project that enables developers to build native desktop applications using React Native. This approach offers significant advantages for agencies:

    • Unmatched Code Reusability: The core value proposition is the ability to share a significant portion of your codebase between your iOS, Android, and macOS applications. This dramatically reduces development time and costs, allowing you to get a high-quality desktop app to market faster.
    • Truly Native Performance: Unlike web-based frameworks, a React Native macOS app is compiled into a native application. It uses Apple’s own AppKit UI components, ensuring that your app looks, feels, and performs just like a traditional macOS application. This provides a superior user experience with smooth animations and a familiar interface.
    • Leverage Existing Expertise: If your agency already has a skilled React Native team, they can immediately begin building for macOS. There’s no need to hire a separate native macOS (Swift/Objective-C) team, making it a highly cost-effective and efficient solution.

    Current Version & Release Insights

    • The latest published version is 0.78.5, released just 8 days ago on npm.

    • Release history highlights:

      • Version 0.78.3: April 2025

      • Version 0.77.4: July 2025

    Setup and Installation Process

    Setting up your macOS project with React Native is straightforward:

    1. Ensure you have a macOS system and Xcode installed.
    2. Clone and integrate the react-native-macos into your React Native project.
    3. Initialise and run your project using React Native command-line tools.

    Advantages of Using React Native for macOS Applications

    The key benefits include code reuse across mobile and desktop platforms, familiar React patterns, and achieving native app performance with deep system integration.

    • Reusability: Leverage your existing React components and business logic across iOS, Android, and now macOS.

    • Developer Experience: Enjoy features like live/hot reloading and a unified JavaScript-based workflow with npm.

    • Community & Support: Backed by Microsoft, it benefits from active maintenance and RFCs, while being open source under the MIT License

    Technical Feasibility

    Technical Requirements and Prerequisites

    • macOS: macOS system, Xcode, react-native-macos library.
    • Windows: Windows OS, Visual Studio, react-native-windows library.

    Both platforms facilitate near-native performance owing to improved bridges and threading models like React Native’s Fabric project.

    Performance Comparison Between macOS VS Windows

    Performance in React Native is tied to its ability to efficiently bridge JavaScript code to native UI components.

    • React Native for Windows: This framework is an official Microsoft project, granting it a high degree of integration with the Windows platform. It uses DirectComposition for rendering, which provides direct access to the GPU, enabling smooth animations and high-performance graphics. This deep integration makes it well-suited for demanding, visually rich applications and complex UIs.
    • React Native for macOS: As a community-driven project, React Native for macOS leverages Apple’s native AppKit framework. While this ensures a true native look and feel, it may not have the same level of direct-to-metal optimisation found in the Windows framework. However, it still delivers excellent performance for most standard business and consumer applications, as it compiles to a native application rather than a web-based wrapper.

    Scalability Comparison Between macOS VS Windows

    Scalability refers to how easily the framework can handle growing complexity and features in a large-scale application.

    • React Native for Windows: Due to its status as an official Microsoft project, this framework boasts a robust and well-documented API. It’s designed to seamlessly integrate with the broader Windows ecosystem, including UWP (Universal Windows Platform) and WinUI, which makes it highly scalable for enterprise-level applications that need to access a wide array of Windows-specific services and hardware. This support provides a predictable and reliable path for adding new features over time.
    • React Native for macOS: The community-driven nature of this project means that its scalability depends on the maturity of its codebase and available third-party libraries. While it has proven capable of building and maintaining large-scale apps, integrating with certain niche or brand-new macOS APIs may require a custom native module to be written. This can add a layer of complexity for projects with highly specific feature sets.

    react native expert advice
    react native expert advice

    Tools and Resources

    For agencies looking to unlock desktop potential with React Native for macOS, a specific set of tools and resources is required to ensure a smooth and professional development workflow. Here is a breakdown of the essential components and where to find them.

    1. Core Framework and Environment

    • React Native for macOS: This is the foundational framework that allows you to build native macOS apps using React and JavaScript. It’s a key part of the official React Native “Out-of-Tree Platforms” and is actively developed by Microsoft.
    • macOS: Development is tied to the macOS ecosystem. You will need a Mac device to build and run your applications.
    • Xcode: Apple’s official IDE is essential. It’s required for building, debugging, and deploying your app, as it handles the compilation of the native macOS components.
    • Node.js & React Native CLI: These are the core command-line tools for a standard React Native project. You’ll use the CLI to initialise your project and run your application on a macOS simulator or device.

    2. UI and Component Libraries

    While you can use many standard React Native libraries, some are particularly useful or have specific support for macOS.

    • React Native for macOS: This framework’s core components are the building blocks. You should become familiar with its specific components and APIs, as they are tailored for the macOS user interface.
    • React Navigation: The standard for navigation in React Native, it works seamlessly with the macOS framework to create a multi-screen desktop application.
    • React Native Elements & Gluestack UI: These popular UI toolkits provide a wide array of pre-built, customizable components that can help accelerate development and maintain design consistency across your desktop and mobile apps.

    3. Development and Debugging Tools

    • Visual Studio Code (VS Code): A highly recommended code editor for React Native development. Its extensive marketplace of extensions, including “React Native Tools,” provides excellent features for code completion, debugging, and linting.
    • Reactotron: A powerful desktop app for inspecting your app’s state, API requests, and much more. It’s an invaluable tool for debugging and understanding the data flow in your application.
    • Jest: A JavaScript testing framework used for unit testing. It ensures the reliability and correctness of your application logic, which is crucial for large-scale projects.
    • ESLint & Prettier: These tools are used for maintaining code quality and consistency. They help enforce best practices and automatically format your code, which is essential for collaborative agency environments.

    4. Key Resources and Documentation

    • Official GitHub Repository: The react-native-macos GitHub repository is the authoritative source for documentation, release notes, and community support.
    • React Native Official Docs: The official React Native documentation has a section dedicated to “Out-of-Tree Platforms” that provides specific guides for setting up and working with React Native for macOS.
    • Community Forums & Blogs: Engaging with the community on platforms like GitHub, Reddit, and various developer blogs can provide valuable insights and solutions to common challenges.

    By leveraging these professional-grade tools and resources, your agency can efficiently build and deliver high-performance, native macOS applications that truly unlock the desktop’s potential.

    Conclusion

    React Native for macOS and Windows stands out as a formidable option for developers aiming to create robust, efficient, and visually appealing desktop applications. By leveraging the shared codebase approach, React Native facilitates streamlined, cross-platform development processes that cater to a modern computing environment.

    Our team has proven expertise in building and deploying high-performance desktop applications with React Native for both macOS and Windows. We can help you leverage this powerful technology to expand your product’s reach and deliver a seamless experience to your users. Contact us for a free consultation today!

    Call to Action

    Lastly, for developers looking to dive deeper into React Native for desktop application development, exploring detailed documentation, engaging with community forums, and experimenting with tutorials are excellent next steps. Start your journey by visiting React Native Official and  Microsoft Docs.

    This extensive guide encapsulates the transformative capabilities of React Native, not just in mobile but in shaping the future of desktop applications, leveraging its versatile platform to innovate and push the boundaries of what’s possible in software development.

    Frequently Asked Questions

    1. What are the primary benefits of using React Native for desktop application development?

    Using React Native for desktop allows developers to maintain a single codebase for multiple platforms, achieve native performance, and leverage React’s familiar patterns, thereby increasing development efficiency and reducing time-to-market.

    2. How does React Native ensure performance parity between macOS and Windows applications?

    React Native utilises optimised bridges and threading models, such as the Fabric architecture, which enhance UI performance and ensure that both macOS and Windows applications run efficiently with near-native performance.

    3. What resources are recommended for developers new to React Native desktop development?

    Developers are encouraged to explore detailed documentation from React Native Official, engage with community forums such as those provided by Creeole Studios, and utilise guides like React Native for Windows: Your Ultimate Guide to build a strong foundation in desktop development.

    4. Is a React Native macOS app just a web app in a window?

    No, absolutely not. This is a common misconception. Unlike frameworks that package a web view (like Electron), React Native for macOS renders a native UI. Your app directly uses AppKit components, resulting in superior performance and a true native look and feel.

    5. What are the limitations of this approach?

    While powerful, the framework is still community-maintained. This means that support for certain niche or newly released macOS APIs might not be available out of the box. For such cases, a skilled native developer can write a native module to bridge the functionality.

    6. Does this save us money over a native build?

    Yes. By sharing a substantial portion of the business logic and UI components with your mobile apps, you significantly reduce the amount of time and resources required for development. This is far more efficient than building and maintaining separate codebases for each platform.

    7. How does a React Native macOS app compare to an Electron app?

    While both can create desktop applications from a single codebase, they are fundamentally different. Electron builds a web app and embeds it in a native shell. React Native for macOS compiles to a truly native app that runs directly on the OS, giving you better performance, a smaller memory footprint, and a more seamless user experience.

  • What Is The Diffrence Between React Native vs ReactJS?

    What Is The Diffrence Between React Native vs ReactJS?

    Key Takeaways

    • ReactJS is perfect for building dynamic and high-performing web interfaces with its Virtual DOM and extensive ecosystem.
    • React Native enables the creation of native-like mobile applications across iOS and Android using a single codebase.
    • Choosing between cross-platform and web development depends on your project’s specific needs and target audience.
    • Understanding the technical differences between ReactJS and React Native is crucial for selecting the right technology stack for your project.

    Introduction

    When it comes to developing applications today, understanding the difference between React Native and ReactJS is paramount for choosing the right technology stack. Both ReactJS, a robust JavaScript library for crafting dynamic web interfaces, and React Native, a powerful framework for creating cross-platform mobile apps, are popular choices in the tech community. This post aims to dissect their pros and cons and guide on cross-platform vs web development, helping you make informed decisions for your upcoming software projects.

    Understanding ReactJS

    ReactJS: Essential for Dynamic Web Interfaces

    ReactJS helps you build fast and dynamic web interfaces. Its core feature, the Virtual DOM, allows for efficient updates, which is crucial for high-performing web applications. This makes it ideal for single-page applications (SPAs), interactive dashboards, and web portals that require frequent UI updates.

    • Fast Rendering: The Virtual DOM enables updates to be made efficiently without refreshing the entire view.
    • Cross-Browser Compatibility: ReactJS ensures your application looks consistent across all web browsers.
    • Rich Ecosystem: With an extensive library and community support, ReactJS offers tools and plugins that are invaluable for modern web development.

    Common use cases include platforms like the web versions of Facebook and Instagram, where rapid UI refreshes are frequent.

    References:

    React Native App company agency

    Understanding React Native

    React Native: A Gateway to Cross-Platform Mobile Applications

    React Native is more than just a framework; it’s a solution for building native-like apps across iOS and Android with a single codebase. By compiling JavaScript code into native mobile components, React Native allows for a seamless user experience akin to native apps.

    • Code Sharing Across Platforms: Write once and use the same code for both iOS and Android, saving time and resources.
    • Native UI and Performance: React Native applies platform-specific UI components, achieving a native look and feel.
    • Hot Reloading: View changes instantly without losing your application state, which speeds up development.
    • Access to Device APIs: It integrates with native modules, offering full use of the phone’s hardware and features.

    Projects like Discord and Bloomberg utilise React Native for its efficiency in managing one codebase for both platforms.

    References:

    Cross-Platform Development vs Web Development

    Navigating the choice between cross-platform vs web development is crucial for modern software projects.

    • Cross-Platform Development: By utilising a single codebase to deploy on multiple platforms, tools like React Native reduce both development and maintenance time.
    • Web Development: Focuses on creating experiences directly in web browsers without concerns about specific device platforms. ReactJS enables smooth, interactive web experiences that are highly accessible and SEO-friendly due to server-rendered capability.

    Choosing ReactJS is best for projects that require strong online visibility and broad accessibility, while React Native is optimal for applications needing a native presence on both iOS and Android.

    References:

    Key Comparison Points for Agencies

    Feature ReactJS (Web) React Native (Mobile/Desktop)
    Output Renders HTML, CSS, and JavaScript, which run in a web browser. Renders native UI components like <View> and <Text>, which run directly on the device’s operating system.
    Performance Highly performant for web applications due to the use of a Virtual DOM to optimize UI updates. Delivers near-native performance because it uses the platform’s native rendering APIs. There is no web-based rendering engine involved.
    Styling Uses standard web technologies like CSS, SCSS, or CSS-in-JS libraries. Uses a JavaScript-based styling API (StyleSheet.create()), which is similar to CSS but with a focus on mobile layout properties.
    Platform APIs Limited to what is available in a web browser (e.g., HTML5 Geolocation API, WebSockets). Can access native device features like the camera, accelerometer, GPS, and push notifications, all through a JavaScript bridge.
    Use Cases Web apps, e-commerce platforms, complex single-page applications, and interactive websites. Mobile apps (iOS & Android), cross-platform desktop applications (Windows & macOS), and Minimum Viable Products (MVPs) that need to reach multiple mobile platforms quickly.
    Development Relies on a web browser and developer tools for debugging. The development cycle is very fast with hot reloading. Requires a more complex setup with native IDEs like Xcode (for iOS) and Android Studio (for Android). Debugging on physical devices can be more involved.

    Differences Between React Native and ReactJS

    Understanding the technicalities can better inform your platform choice:

    • Technical Architecture: ReactJS operates in the browser using a Virtual DOM, while React Native uses a bridge to convert JS into native mobile code.
    • Platform: ReactJS is crafted for web browsers; React Native is for mobile devices.
    • Performance: ReactJS is optimised for quick web updates; React Native offers robust mobile performance but can have overhead due to the bridge.
    • Development Workflow: Different tools are needed for each; ReactJS uses Webpack and npm, whereas React Native works with Metro and native IDEs.

    Evaluate these differences to choose the technology that aligns with your project needs.

    Aspect React JS React Native
    Platform Web browsers Mobile (iOS, Android) can be extended to desktop
    Base Language JavaScript, JSX JavaScript, JSX
    Rendering Uses the Virtual DOM to render HTML in browsers Uses native components instead of HTML; bridges JS to native APIs
    Styling CSS, SCSS, styled-components Stylesheets in JavaScript (React Native style objects)

    References:

    Development Environment

    Feature React JS React Native
    IDE Any code editor (VS Code, WebStorm, etc.) Same editors + platform-specific emulators
    Testing Browser-based testing Requires mobile simulators/emulators or real devices
    Deployment Deployed on web servers Published via App Store (iOS) or Play Store (Android)
    react native without expo developer

    Quick Pros & Cons

    React JS Pros React JS Cons
    Mature ecosystem for web Not mobile-focused
    Easy SEO optimisation Needs separate tech for mobile
    Great for SPAs and PWAs Browser limitations for performance
     
    React Native Pros React Native Cons
    Cross-platform mobile development Not ideal for heavy 3D graphics apps
    Native performance Requires native code knowledge for some features
    Large community More setup complexity than web

    Conclusion

    In conclusion, both React Native and ReactJS offer unique advantages and can be pivotal in the success of your software projects. They share a foundational architecture but diverge significantly in targets and execution. Whether you opt for ReactJS with its web-centric approach and SEO advantages or React Native’s cross-platform efficiency and native performance, assessing your project’s scope, target audience, and necessary functionalities will guide your decision.

    Remember, the right choice aligns technology with strategic business objectives to ensure project scalability, performance, and maintainability.

    Additional Resources

    Explore further with these resources to deepen your understanding and aid your development journey:

    Frequently Asked Questions

    1. If we build our app in ReactJS, can we convert it to React Native later?

    No, not directly. While both use React’s syntax, their core components are different. A ReactJS web component (e.g., <p> or <div>) cannot be directly used in a React Native app. However, much of the business logic and state management code can be shared and reused, which significantly saves time during a subsequent mobile development phase.

    2. Which one is faster to develop in?

    For an experienced developer, both are very fast. However, a ReactJS web app generally has a faster development cycle because the build process is less complex. A React Native app requires compilation for each native platform, which can be more time-consuming.

    3. Does React Native use web technologies like HTML and CSS?

    No. React Native’s components are not HTML elements. Instead of using a web browser to render, it communicates with the native UI components of the device’s operating system. Styling is done using a JavaScript-based API that is very similar to CSS, but the underlying rendering is completely native.

    4. Why can’t we just use a web app on a mobile browser instead of a native app?

    While a web app works on a mobile browser, it won’t be able to access native device features like the camera, GPS, or push notifications as seamlessly as a native app. The user experience can also feel different, as native apps are designed to be integrated with the device’s specific interface and gestures.

    5. Can we have both a web app and a native app that share the same backend and a lot of the same code?

    Yes, this is a very common and efficient strategy. By building your app’s core business logic, state management, and backend communication in a modular way, you can reuse this code across both your ReactJS web app and your React Native mobile app, saving time and ensuring consistency.

  • 10 Mistakes to Avoid Developing A React Native App

    10 Mistakes to Avoid Developing A React Native App

    Key Takeaways

    • Avoid common React Native errors to ensure smooth app development.
    • Optimise performance to maintain user satisfaction and app efficiency.
    • Adhere to coding standards for high-quality, maintainable code.
    • Plan your app structure to prevent chaotic code and difficult bugs.
    • Minimise the use of external libraries to reduce bugs and maintenance complexity.

    Mistakes to Avoid When Developing an App: A Comprehensive Guide

    Developing a robust, user-friendly application demands meticulous attention to detail and a proactive approach to avoiding common pitfalls. The phase “mistakes to avoid when developing an app” encompasses a variety of errors that could derail the functionality and success of your software. By understanding common React Native errors, performance pitfalls, and the significance of adhering to coding standards, developers can navigate these challenges and enhance the quality of their applications. Insights from extensive research emphasise that steering clear of these mistakes not only streamlines the development process but also curtails costs and facilitates smoother application launches.

    Common React Native Errors

    Turn mistakes into opportunities with react native experts

    Introduction to Common React Native Challenges

    React Native emerges as a powerful tool for app development, but it brings with it a set of unique challenges, typically stemming from common errors in its utilisation.

    Error 1: Wrong Estimations

    Definition: Developers often mistakenly assume that components and layouts will function identically across varied platforms. Example: UI layouts designed for iOS might not render correctly on Android, creating inconsistencies. Solution:
    • Plan for differentiation between platforms from the beginning.
    • Conduct early analyses of backend compatibility across systems.

    Error 2: Overusing External Library

    Definition: Relying heavily on external libraries can slow down the app, introduce bugs, and complicate maintenance. Example: Implementing several image processing libraries when one suffices. Solution:
    • Choose well-supported libraries that directly address your needs.
    • Adopt a minimalist approach to adding external libraries.

    Error 3: Not Planning App Structure

    Definition: The absence of a predefined structure can lead to chaotic code and challenging bugs. Example: Mixing of component files with utility functions without a coherent directory structure. Solution :

    Error 4:Ignoring Platform-Specific Differences

    Mistake:
    React Native is cross-platform, but iOS and Android have subtle differences in UI elements, permissions, and navigation behaviours. Ignoring these can cause inconsistent performance or layout issues.

    Example:
    Using TouchableOpacity without considering Android’s ripple effect or iOS’s gesture differences.

    Solution:

    • Use Platform-specific code.
    • Test thoroughly on both platforms.

    • Leverage platform-specific libraries like react-native-safe-area-context

    Additional React Native Errors

    React Native development is also hindered by other errors, such as not reviewing the code of external modules, mutating state within render functions, styling inaccuracies, and using unoptimized assets. Each of these issues warrants careful consideration and specific strategies to mitigate. For example, always use setState for state changes, and optimise assets before integration. Detailed explanations and solutions to these issues are discussed extensively on platforms like YouTube. For advanced debugging techniques, refer to Mastering Debugging Techniques for React Native App Development.
    Avoid mistakes with react native experts

    Performance Pitfalls

    Performance optimisation is crucial for ensuring that the app remains responsive and efficient. Neglecting this aspect can lead to user dissatisfaction and attrition.

    Pitfall 1: Neglecting Performance Optimisation

    Definition: Omitting performance enhancement measures results in sluggish applications. Solution:
    • Use React.memo and useMemo for memoisation to avoid unnecessary re-renders.
    • Optimise images and use them FlatList for large lists to enhance performance.
    For comprehensive techniques, consult dev. to. Additionally, Optimising and Deploying Your React Native App provides in-depth strategies for performance optimisation.

    Pitfall 2: Unmanaged State

    Definition: Inefficient state management leads to unnecessary re-renders and performance hiccups. Solution:
    • Employ effective state management frameworks like Redux or MobX.
    • Refrain from excessive use of local states when global solutions are applicable.
    Learn more about managing state efficiently on dev. to.

    Adhering to Coding Standards

    Consistency in coding is vital for maintaining high code quality and facilitating teamwork. Adhering to established coding standards is not merely a best practice but a critical necessity.

    Key Coding Standards and Implementation Tips

    • Consistent Naming Conventions: Stick to a naming strategy like camelCase for variables and PascalCase for components.
    • Modularise Code: Organise code into modules for better reusability and clarity.
    • Version Control and Quality Tools: Implement tools like Git, ESLint, and TypeScript to track changes and enhance code quality.

    Pro Tip: Always keep your React Native version and libraries updated. Many performance improvements come from newer versions.

    Conclusion

    Staying informed about and vigilant against potential development errors, such as common React Native errors, performance pitfalls, and lapses in coding standards, is imperative for building successful applications. By applying the strategies and best practices discussed, developers can significantly uplift the quality and reliability of their apps, ensuring a smoother development journey and a robust end product.

    Additional Resources

    For ongoing learning and updates, developers are encouraged to engage with resources like React Native’s official documentation, browsing performance optimisation guides, and participating in coding communities such as Stack Overflow and Reactiflux Discord. These platforms provide valuable insights and a community-driven support system that can help in refining development skills and staying updated with the latest trends. By prioritising these aspects and continuously enhancing their craft, developers not only avoid common mistakes but also advance their skills, ensuring their applications stand out in a competitive digital landscape.

    Previous Blog Posts

    Frequently Asked Questions

    1. What are the common mistakes to avoid when developing a React Native app?
    Common mistakes include wrong estimations of component behaviour across platforms, overusing external libraries, and not planning the app structure properly.
    Neglecting performance optimisation can lead to sluggish applications, resulting in user dissatisfaction and attrition.
    Adhering to coding standards ensures consistency, high code quality, and easier maintenance, which are critical for teamwork and long-term project success.
    Overusing external libraries can slow down the app, introduce bugs, and make maintenance more complicated.
    Establish a clear structure for folders and components early in the project, and segregate screens, components, and services into distinct folders.
  • How To Integrate React Native for Apple Watch?

    How To Integrate React Native for Apple Watch?

    Key Takeaways

    • React Native streamlines the development of Apple Watch applications, offering cross-platform capabilities.
    • Developing for wearables presents unique challenges, including limited screen space and the need for optimised battery usage.
    • Effective integration with watchOS enhances app functionality and user experience.
    • Choosing between React Native and native development involves considering factors like development speed, UI consistency, and platform integration.
    • Utilising tools like Expo and react-native-watch-connectivity can significantly aid in the development process.

    Revolutionising Wearable Tech: React Native for Apple Watch App Development

    React Native for Apple Watch is transforming the way developers create applications for wearable technology. As the wearable technology market continues to burgeon, driven by an uptick in the adoption of devices such as smartwatches and fitness trackers, the demand for streamlined and efficient wearable app development is more pronounced than ever. These developments promise not only enhanced convenience but also personalised user experiences adapted to individual routines.

    react native App with solid foundation
    react native App with solid foundation

    Understanding Wearable App Development

    Wearable app development encompasses the creation of software specifically designed for wearable devices, such as smartwatches, fitness trackers, and other similar devices. It stands out due to unique challenges such as limited display space and the need for optimised battery usage, which demands innovative solutions for the user interface and functionality.

    While there is no “official” or direct way to write a WatchOS app using React Native’s JavaScript components, a highly effective and professional approach involves building a seamless bridge between a native WatchKit app and a React Native iOS app. This strategy allows you to leverage your existing React Native codebase for the core mobile application while providing a fast, responsive, and truly native experience on the Apple Watch.

    Key Considerations in Wearable UI Design

    • Limited Screen Space: The small screens of wearable devices require developers to design concise, glanceable interfaces that provide essential information at a quick glance.
    • Battery Life and Performance: Developers must focus on minimising power consumption while ensuring smooth performance [UI Challenges].
    • Seamless Integration: Effective synchronisation between wearables and smartphones is critical, enabling a cohesive user experience [Integration Essentials].

    Why Opt for React Native in Smartwatch Development?

    React Native, a JavaScript framework, is renowned for facilitating the development of cross-platform apps with React, offering a blend of efficient development cycles and native-like user experiences for both iOS and Android devices. Read more.

    • Growing user base: According to Demand Sage Mordor Intelligence, with nearly half a billion users on smartwatches and rising, investing in watchOS features can broaden app reach. 

    • Premium user segment: The Apple Watch remains a dominant, high-margin device used for health and utility scenarios, making dedicated watchOS features particularly compelling.

    • Competitive shift: While Apple faces softening in dominance, a well-integrated, polished watch app can differentiate your brand in a competitive smartwatch ecosystem.

    Global Rise of the Wearable Market


    As per the Fortune Business Insight report, the global wearable technology market was valued at USD 78.40 billion in 2024. It’s projected to reach USD 191.58 billion by 2032, with a 12.0% CAGR. North America leads the market with a 39.05% share in 2024. The smart clothing sector currently holds a 9% share, driven by a growing focus on fitness.

    Advantages of React Native for Wearables

    • Faster Development Cycles: Developers benefit from reusable codebases, which accelerate the development process considerably [React Native Benefits].
    • Consistent UI Across Platforms: Uniform UI components across different devices enhance the user experience.
    • Ease of Mobile Integration: React Native simplifies the development of companion apps that seamlessly interact with Apple Watch extensions.

    Comparing React Native with Native Development Approaches

    Feature React Native Native (Swift/Obj-C)
    Development Speed Faster with a reusable codebase Slower, tailored to the platform
    UI Consistency High across devices Customizable per platform
    Performance Suitable for most needs Optimal utilises full hardware capabilities
    Platform Integration Intermediate due to bridges Comprehensive API access

    Despite its advantages, React Native may face limitations in accessing deep native functionalities of platforms like watchOS, which native development can leverage to a greater extent.

    Step-by-Step Guide to Developing Smartwatch Apps with React Native

    Setting Up Your Environment

    1. Start a React Native Project: Initialise a new project using React Native CLI or Expo, which provides a streamlined setup process. Learn how.
    2. Create an Apple Watch Target: Integrate an Apple Watch extension within your Xcode project to manage watch-specific features.
    3. Implement Bridging Tools: Use tools like react-native-watch-connectivity to facilitate communication between the iPhone and Apple Watch, ensuring smooth data transfer [Environment Setup].

    Designing for Small Screens

    • Focus on clear, minimalist designs that convey information quickly and efficiently.

    • Leverage Apple Watch design principles to ensure content is easily understandable at a glance.

    Optimizing Performance

    • Prioritise foreground activities while minimising background processing to preserve battery life.
    • Use efficient data handling strategies for updates and notifications, optimising the user’s experience without excessive battery drain.

    Architect Your Data Flow

    A professional approach involves architecting a clear data flow. The React Native app acts as the data source, fetching and managing data (e.g., from a backend API). It then uses the native bridge to push relevant information to the Watch app, which then updates its native UI. This ensures the watch app remains lean and efficient, while the React Native app handles the heavier lifting.

    Integrating with watchOS

    WatchOS integration is crucial for tapping into the advanced capabilities of Apple Watch, such as complications and specialised notifications. This involves setting up appropriate targets in Xcode, using the Watch Connectivity API for seamless data flow, and ensuring that your app leverages watchOS-specific UI components for optimal functionality. Detailed guide.

    Navigating Technical Challenges

    While React Native provides a robust framework for developing companion apps, it presents challenges such as the need for additional bridging to connect React Native with native modules. Overcoming these involves strategic planning and may require integrating tailored native code to access full-device features, which can complicate the development process. Learn more.


    Empowering Developers: Tools and Resources

    To aid developers in crafting superior wearable applications, several tools and resources are indispensable:

    • React Native Watch Connectivity: Enhances the communication between iOS apps and Apple Watch.
    • Expo: Simplifies the initial project configuration and offers a robust testing environment.
    • Apple’s watchOS Documentation: Provides comprehensive guidance on utilising the full potential of watchOS features.

    Developers are also encouraged to explore community forums and GitHub repositories for additional insights and collaborative opportunities, which are invaluable in tackling specific developmental hurdles [Community Resources].

    Things To Keep In Mind

    • React Native cannot run directly on watchOS—use native development with SwiftUI for Apple Watch apps.

    • Bridge with WatchConnectivity to connect your RN iOS app and native watch extension.

    • Market is growing, though competitive: Apple is still a major player, even with shifting market dynamics.

    • Value lies in seamless, lightweight integrations that enhance health, convenience, and user retention.

    Conclusion

    React Native for Apple Watch heralds a new era in wearable app development, combining the efficiency of cross-platform development with the capability to integrate deeply with native features. While it comes with its set of challenges—particularly in handling watchOS-specific functionalities—it remains a formidable tool for developers aiming to innovate and excite in the wearable tech space. As this technology evolves, the community around it grows, promising even more robust solutions and creative possibilities for future wearable applications.

    Our team has proven expertise in both React Native and native iOS development to seamlessly integrate your mobile application with Apple Watch. We can build the robust communication bridges and native WatchKit extensions required to deliver a fluid, high-performance user experience.

    Contact us for a free consultation today to discuss your vision and see how we can bring your React Native app to life on the Apple Watch!

    Frequently Asked Questions

    1. Is it possible to write the entire Apple Watch app in React Native?

    No. Apple Watch apps run on a different architecture (watchOS) that does not include the JavaScript runtime required by React Native. The core of the Watch app’s UI and logic must be written natively in Swift or Objective-C. React Native is used to build the companion iOS app and to establish a robust communication bridge.


    2. What are the key benefits of this hybrid approach?

    This approach leverages the strengths of both technologies. You get the speed and single codebase efficiency of React Native for your main iOS app, while ensuring the Apple Watch app is highly performant and responsive with a truly native user experience. This also simplifies the management of data and business logic, as it’s primarily handled on the main app.

    3. What are the main limitations?

    The main limitation is that you cannot reuse your React Native UI components for the watch app. The Watch app must be developed separately, which adds to the development time. Additionally, some complex, real-time data synchronisation may require careful management to ensure a smooth user experience.

    4. How does this affect the project timeline and budget?

    While this method is more efficient than building both the main app and the watch app from scratch with native code, it still requires specialised expertise. The timeline and budget will be slightly higher than a mobile-only project, as it includes the development of the native watch app and the communication bridge. However, the investment results in a superior user experience and a powerful new touchpoint for your product.


  • Why Build React Native for Windows in 2025?

    Why Build React Native for Windows in 2025?

    React Native has revolutionised the way developers build mobile applications, combining the best aspects of native performance with the agility of JavaScript development. Now, this versatile framework is expanding its horizons beyond mobile, offering robust solutions for desktop application development on Windows and macOS platforms. In this post, we will delve into the technical feasibility of using Windows apps with React Native and explore React Native macOS applications, highlighting the growing trend towards unified codebases that transcend individual platforms. Overview of React Native

    Overview of React Native

    React Native is an open-source JavaScript framework developed by Facebook, enabling developers to create native applications for multiple platforms using a single codebase of React and JavaScript. Originally targeted at iOS and Android, its capabilities have extended thanks to a vibrant community contributing to its expansion. The key advantages of React Native include:

    • Unified development workflow that promotes code reuse across iOS, Android, and now desktop platforms
    • A large open-source community that drives continuous innovation and extension of the framework

    React Native’s adaptability now includes support for desktop environments, paving the way for applications that run seamlessly across mobile devices and desktop computers. More information about React Native’s core features can be found on the Creole Studios website. Additionally, for a comprehensive understanding of multi-platform development with React Native, visit Harnessing React Native App Development Services for Seamless Multi-Platform Mobile Apps.

    Why Build with React Native for Windows?

    Advantages of React Native App for Windows

    AdvantageBenefit
    Cross-platform code reuseShare logic & UI components across mobile and desktop
    Native performanceUses native Windows APIs for smooth rendering
    Familiar tech stackJavaScript, TypeScript, React
    Microsoft ecosystem integrationAccess Windows-specific APIs (file system, notifications, etc.)
    Large communityBacked by Microsoft + React Native community

    React Native for Windows

    Windows apps with React Native are developed through React Native Windows, a Microsoft-supported extension. This allows developers to adapt their existing React Native code for the Universal Windows Platform (UWP) and Win32 applications, making it possible to maintain a unified codebase. Essential tools for setting up a React Native for Windows project include:

    • Node.js and the React Native CLI
    • Visual Studio 2022, equipped with the necessary workloads for Windows and C++ development

    Developers are provided the tools to build applications compatible with both recent versions of Windows 10 and Windows 11, leveraging the latest Windows APIs. Examples of successful implementations include Microsoft’s own products and numerous enterprise applications that take advantage of this cross-platform approach. Learn more about this from Shivlab and the detailed guides on React Native for Windows Documentation. For an ultimate guide on building cross-platform desktop applications, refer to Solution Squares.

    Build Windows App with React Native

    React Native for macOS

    Similarly, React Native macOS extends the framework’s capabilities to Apple desktop environments. With tools such as Xcode and the react-native-macos CLI developers can bring their applications to macOS, supported by active community projects and Microsoft’s support initiatives. Compatible with the latest macOS versions, this extension allows the development of native macOS applications using the familiar React Native components and APIs. For implementation examples and further info, check Creole Studios.

    Prerequisites

    Before starting, make sure you have:

    RequirementNotes
    Windows 10 or 1164-bit, Version 1809 (Build 17763) or later
    Node.jsLTS version (e.g., 18.x)
    YarnOptional but recommended
    Visual Studio 2022With Desktop development with a C++ workload
    React Native CLIFor project creation
    Windows SDKComes with Visual Studio

    Developing Windows Apps with React Native

    Building Windows applications with React Native involves specific setup steps:

    1. Install Node.js and the React Native CLI.
    2. Set up the development environment in Visual Studio with the necessary workloads.
    3. Initialise your React Native project and add Windows compatibility with specific commands designed to streamline the process.
    4. Extensive testing across different Windows versions ensures compatibility and optimises performance.

    This process, detailed React Native for Windows Documentation, underscores the adaptability and potential of React Native in creating desktop applications. For additional optimisation and deployment strategies, visit Solution Squares.

    Comparing React Native Windows and React Native macOS

    Both extensions offer tailored experiences for their respective platforms, but they share a unified approach to React Native development. Key differences lie in supported platforms, toolchains, community support, and the specific use cases they cater to, as demonstrated in the following table:

    AspectReact Native WindowsReact Native macOS
    Supported PlatformWindows 10, 11, UWP, Win32Current macOS releases
    ToolchainVisual Studio 2022, Windows Build ToolsXcode, macOS CLI
    Community SupportStrong (Microsoft-backed, official docs)Growing (community-driven, some Microsoft support)
    Platform APIsWindows APIs, C++, UWP componentsmacOS APIs, Swift/Obj-C native modules
    Use CasesEnterprise desktops, utilities, and productivity toolsCreative tools, utilities, and cross-device apps
    LimitationsMobile APIs not mapped to desktop equivalentsAdditional Apple platform restrictions

    For a deeper comparison between React Native and other frameworks, explore React Native vs ReactJS: Navigating the Differences for Your Next Project.

    Why React Native for Desktop Matters

    Traditionally, businesses had to develop separate applications for Windows, macOS, and mobile platforms—a process that was costly, time-consuming, and complex. With React Native for Desktop, agencies can:

    • Use a single codebase → Develop apps that work across mobile, web, and desktop.

    • Reduce costs → Faster development cycles lower project budgets.

    • Ensure consistent UX → Unified interfaces across all platforms.

    • Tap into a growing ecosystem → Backed by Microsoft (React Native Windows + macOS) and community-driven efforts.

    Useful Libraries for Windows Development

    LibraryPurpose
    react-native-windowsCore Windows integration
    react-native-fsFile system access
    react-native-vector-iconsIcons
    react-navigationRouting/navigation
    react-native-device-infoSystem info
    Technical Feasibility Analysis

    Building desktop applications with React Native is technically feasible if developers possess proficiency in React Native and JavaScript/TypeScript, along with access to platform-specific build tools like Xcode for macOS and Visual Studio for Windows. The performance of apps can be akin to native applications for several use cases, especially when employing optimisation techniques like the Hermes JavaScript engine.

    Future of React Native in Desktop Development

    React Native has long been the go-to framework for building high-quality cross-platform mobile apps. But in recent years, it has evolved beyond mobile—expanding into desktop development for Windows, macOS, and even Linux. For agencies, this evolution opens the door to faster delivery, broader reach, and cost savings for clients who want multi-platform solutions with a single codebase. So, what does the future of React Native in desktop development look like, and why should agencies care?

    Cross-Platform Strategy

    You can target:

    • Android + iOS → Mobile

    • Windows + macOS → Desktop

    • Web → Browser (using React Native for Web)

    By structuring your app with shared logic + platform-specific components, you can cover all platforms with a single codebase.

    React Native application Agency
    React Native application Agency

    Conclusion

    The potential for building feature-rich, native desktop applications with React Native is immense. With strong community and official support, the framework is well-positioned to become a staple in the toolbox of developers aiming to leverage a unified codebase for mobile and desktop environments. As the ecosystem continues to expand, React Native appears increasingly capable of meeting the intricate demands of modern software development.

    Additional Resources

    For developers eager to dive deeper, the following resources are invaluable:

    • Official Documentation: Comprehensive guides and updates are available at React Native Windows and related Microsoft documentation.
    • Community Tutorials and Forums: Engage with other developers and find solutions through community-driven resources and forums.
    • Essential Tools and Plugins: Node.js, Visual Studio, Xcode, plus various React Native packages, are essential for developing robust applications.

     Whether you’re planning a new project or scaling an existing one, React Native offers a compelling framework for creating seamless and efficient cross-platform applications.

    Frequently Asked Questions

    1. What are the main benefits of using React Native for desktop application development?

    React Native allows developers to use a unified codebase for both mobile and desktop applications, which reduces development time and maintenance efforts. Additionally, it leverages the performance of native applications while providing the flexibility and ease of JavaScript development.

    2. What tools are required to develop React Native applications for Windows?

    To develop React Native applications for Windows, you’ll need Node.js, the React Native CLI, and Visual Studio 2022 with the necessary workloads for Windows and C++ development.

    3. How does React Native ensure performance comparable to native desktop applications?

    React Native leverages native components and APIs, which allows applications to perform similarly to native desktop applications. Additionally, using optimisation techniques like the Hermes JavaScript engine can further enhance performance.

    4. Is it necessary to have separate codebases for Windows and macOS applications in React Native?

    One of the key advantages of using React Native for both Windows and macOS is the ability to maintain a unified codebase. This approach simplifies development and maintenance, allowing developers to reuse most of the code across both platforms.

    5. What are the limitations of using React Native for desktop applications?

    One limitation is that mobile APIs are not always mapped to their desktop equivalents, which can require additional custom implementations. Additionally, there may be platform-specific restrictions, especially on macOS, that developers need to navigate.

  • How To Master React Native for Android? : A Comprehensive Guide

    How To Master React Native for Android? : A Comprehensive Guide

    Key Takeaways

    • Code Reuse Across Platforms: React Native allows developers to write once and deploy on both Android and iOS, significantly reducing development time and costs.
    • Performance: Delivers smooth, native-like performance essential for user retention.
    • Hot Reloading: Enhances development efficiency by providing real-time feedback and quicker iterations.
    • Strong Community Support: A vibrant ecosystem with extensive documentation and active community resources.
    • Comprehensive Tooling: Includes tools for testing, debugging, and continuous integration to ensure app quality.

    Mastering React Native for Android: A Comprehensive Guide

    Introduction: Why React Native for Android is a Game-Changer?

    React Native for Android offers a powerful framework for developers looking to build high-quality Android apps efficiently. As a cross-platform solution that allows the use of JavaScript and React to create native Android applications, React Native stands out in the mobile development landscape.

    What is React Native?

    React Native is a framework developed by Meta that bridges the gap between web and mobile platforms, enabling developers to use JavaScript to build applications that run natively on Android and iOS. Its ability to reuse code across platforms not only speeds up the development process but also reduces the effort required for app maintenance.

    Advantages of React Native for Android Development

    Some of the top benefits of using React Native for Android include:

    • Code Reuse Across Platforms: Write once, run anywhere—this principle dramatically cuts down on development time and costs.
    • Performance: With React Native, your app will deliver smooth, native-like performance, which is crucial for user retention.

    For more insights into React Native’s popularity and effectiveness, visit Simplilearn and the React Native Official Docs.

    Why Choose React Native for Android Development

    Cross-Platform Capabilities and Code Reuse

    React Native is truly unique in how it handles cross-platform development. You can write your application’s code once and deploy it on both Android and iOS devices, which simplifies the development process and reduces maintenance.

    Reduction in Duplication: This approach minimises the need to duplicate code for different platforms, making your codebase cleaner and easier to manage.

    For more details, refer to Simplilearn and How to Build a React Native App: A Comprehensive Guide.

    Faster Development and Deployment Cycles

    Features such as Hot Reloading enhance the development process by allowing real-time feedback and quicker iterations. These capabilities ensure that updates and testing can happen swiftly and smoothly.

    Find more about rapid development features at React Native Tutorials and Optimising and Deploying Your React Native App: The Ultimate Guide to Successful App Deployment.

    Strong Community Support and Rich Ecosystem

    The ecosystem surrounding React Native is both vibrant and mature, with extensive documentation, myriad libraries, and an active community. This ecosystem is invaluable for both learning and troubleshooting.

    Explore community resources at Simplilearn and Top React Native App Development Companies for 2025.

    Getting Started with React Native for Android Phones

    Prerequisites for Setting Up the Development Environment

    Before diving into React Native, ensure you’re familiar with JavaScript, React basics, and essentials like HTML and CSS. You’ll also need Node.js and npm installed on your computer. This foundational knowledge will help streamline your setup process and move forward with creating apps more efficiently.

    Before you begin Android development with React Native, ensure the following are ready:

    Requirement Tools/Versions
    OS Windows, macOS, or Linux
    Node.js LTS version (e.g., 18.x)
    npm / yarn Comes with Node.js / or install Yarn
    Java Development Kit (JDK) Version 11 or 17 preferred
    Android Studio For emulator and Android SDK setup
    React Native CLI For native app builds (not Expo)
    VS Code / Code Editor Any code editor with JS support

    Read about the prerequisites at Simplilearn and A Complete Guide for Prerequisites for React Native Development.

    Installing Necessary Tools and Dependencies

    Setting up your development environment involves several steps:

    1. Install Android Studio: This will be your primary IDE for Android development.
    2. Set up Android SDK: Essential for building Android apps.
    3. Environment Variables Configuration: Ensures your tools function correctly across the system.

    Choose between React Native CLI and Expo CLI for your project scaffolding based on your project needs. The React Native CLI offers more control and customisation, while the Expo CLI provides a more managed environment.

    For a detailed setup guide, explore React Native Environment Setup and this YouTube Tutorial.

    Creating Your First React Native Android Project

    To start your project, use:

    npx react-native init MyProject
    npx create-expo-app MyProject
    

    These commands set up a new React Native project, which you can run on an emulator or a physical device. This practical approach allows you to see the results of your work immediately on an Android device.

    Learn more about project creation at React Native Environment Setup, How to Build a React Native App: A Comprehensive Guide, and Simplilearn.

    Key Features of React Native for Building Android Apps

    Hot Reloading for Efficient Development

    Hot Reloading is a standout feature in React Native, allowing developers to immediately see the result of the latest changes without restarting the app. This feature significantly speeds up development by simplifying the trial-and-error process.

    Further information is available on React Native Tutorials.

    Native Components and Modules Integration

    React Native provides a seamless integration with native Android components, enhancing the app’s performance and user experience. Whether it’s accessing the device’s camera or sending push notifications, React Native bridges JavaScript with native modules effortlessly.

    For examples and more details, visit Simplilearn and Building an Advanced React Native App Example: A Comprehensive Guide to Creating a Quiz App.

    Performance Optimisation Techniques

    To ensure your app runs smoothly, React Native offers several optimisation techniques, such as:

    • Image Optimization
    • Efficient List Rendering with FlatList
    • Minimising Unnecessary Renders

    These strategies help maintain a fluid experience comparable to native applications.

    Discover optimisation strategies at Simplilearn and Performance Optimisation Tips.

    Step-by-Step Guide to Building Android Apps with React Native

    Planning Your App’s Architecture and Design

    When building a React Native app, it’s crucial to structure your project correctly from the start. Organise your code into distinct layers:

    • UI Components
    • Navigation
    • Business Logic
    • Services

    This modular approach not only enhances maintainability but also simplifies scaling your app as it grows.

    Learn about best architectural practices on the Amazon Developers Guide.

    Implementing UI Components Using React Native

    React Native’s component-based structure makes it straightforward to build interactive user interfaces. Utilise core components like View, Text, and Button, and employ third-party UI libraries such as React Native Paper or React Native Elements to enrich your app’s design and functionality.

    Find UI implementation tips at Simplilearn and React Native Tutorials.

    Managing State and Navigation in Your Android App

    Effective state management and navigation setup are pivotal for creating functional, user-friendly mobile applications. Depending on your app’s complexity, you might choose from several options:

    • State Management: React’s useState, Redux, Zustand
    • Navigation: React Navigation provides a robust solution for implementing stack and tab navigators.

    For more guidance on state and navigation management, explore resources at the Amazon Developers Guide and Simplilearn.

    Testing and Debugging Your React Native Android Application

    Testing and debugging are essential phases in the app development process. React Native supports:

    • Just for unit testing
    • Detox for end-to-end tests
    • Chrome DevTools and Flipper for debugging

    These tools help ensure your app is robust and error-free before deployment.

    Detailed testing methodologies can be found at Simplilearn and Mastering Debugging Techniques for React Native App Development.

    Best Practices for Developing with React Native on Android

    Writing Clean and Maintainable Code

    It’s vital to write clean code and structure your projects efficiently when working with React Native. Using modular code that separates components, business logic, and utility classes makes your codebase easier to manage and scale.

    Moreover, adopting TypeScript or PropTypes ensures type safety and reduces the potential for runtime errors.

    For more on coding best practices, check out this Amazon Developers Guide.

    Optimising App Performance and Responsiveness

    Maintaining optimal performance is crucial for the success of your mobile app. Here are a few strategies:

    • Profiler Tools: Use React Native’s built-in or third-party tools to pinpoint performance issues.
    • Efficient Memory Management: Take proactive steps to manage memory usage and prevent leaks.
    • Responsive Design: Ensure your app looks and functions well across various device sizes and resolutions.

    For detailed strategies on enhancing app performance, visit Simplilearn and Website Speed Optimisation Tips.

    Ensuring Compatibility Across Different Android Devices

    Android devices vary significantly in screen size, resolution, and hardware capabilities. It’s important to design your app to be flexible and adaptable to these differences. Implement adaptive layouts and thoroughly test your app on multiple devices to ensure consistent user experiences across all platforms.

    Further tips can be found on Simplilearn.

    Tools and Libraries to Enhance React Native Android Development

    Popular Libraries for UI, State Management, and Networking

    To streamline your development process, integrate these widely used libraries:

    • UI Libraries: React Native Paper, React Native Elements enhance the look and user experience of your apps.
    • State Management Tools: Libraries like Redux, Zustand, or MobX offer advanced state management solutions.
    • Networking: Axios provides a robust framework for handling network requests.

    For an extensive list of tools and their applications, see Simplilearn.

    Tools for Testing and Continuous Integration

    Ensure the quality and stability of your React Native apps by employing tools such as:

    • Jest: For comprehensive unit testing.
    • Detox: For conducting end-to-end tests.
    • CI Services: GitHub Actions and CircleCI can automate your testing and deployment processes, ensuring that every build of your app meets quality standards.

    Comprehensive tooling options are discussed in the Amazon Developers Guide.

    Resources for Learning and Troubleshooting

    Continual learning and troubleshooting are part of the development process. Helpful resources include:

    • Official React Native Documentation
    • Expo Documentation
    • Community Forums like Stack Overflow

    You can also find valuable guidance through community tutorials available on platforms like YouTube.

    Check out these official React Native docs, Expo Docs, and Enhancing Mobile Apps: Comprehensive Guide to React Native with Firebase Integration for more information.

    Case Studies: Successful Android Apps Built with React Native

    Examples of High-Profile Apps Using React Native for Android

    Major apps like Facebook, Instagram, and Discord have leveraged React Native to enhance their performance and user engagement. These apps highlight React Native’s capability to handle large-scale applications efficiently.

    Explore the functionalities these apps achieve through React Native and their impacts on user satisfaction at Simplilearn.

    Lessons Learned and Tips from Real-World Projects

    Real-world examples provide invaluable insights and actionable tips. Key lessons include:

    • Modular Architecture: Keeps code organised and manageable.
    • Regular Testing: Ensures that your app performs well across all updates and changes.

    For more real-world insights, visit Simplilearn and Mastering Debugging Techniques for React Native App Development.

    Monetisation and Deployment Strategies

    Preparing Your React Native App for the Google Play Store

    Launch your app on the Google Play Store by following these steps:

    • Generate a Signed APK or AAB: This is essential for publishing your application.
    • Follow Google Play Store Submission Guidelines: Ensure your app meets all the required criteria for acceptance on the store.

    For a comprehensive guide to preparing for store submission, refer to React Native Environment Setup and Optimising and Deploying Your React Native App: The Ultimate Guide to Successful App Deployment.

    Strategies for App Monetisation and User Acquisition

    Explore various monetisation strategies such as in-app ads, purchases, or offering a paid version of your app. To effectively attract and retain users, implement solid marketing strategies and optimise your app’s presence on the app store.

    Learn more about monetisation and marketing strategies at Simplilearn.

    Maintaining and Updating Your Android App Post-Launch

    After launching your app, it’s important to continue maintaining and updating it based on user feedback and performance metrics. Keep your app fresh and engaging by:

    • Monitoring Performance: Use analytics to track how well your app is performing.
    • Updating Dependencies: Keep your app’s libraries and frameworks up to date.
    • Releasing New Features: Continuously improve the app’s functionality and user experience.

    For maintenance best practices, consult the detailed guides on Simplilearn and Optimising and Deploying Your React Native App: The Ultimate Guide to Successful App Deployment.

    Conclusion: Start Building Your Android App with React Native Today

    Recap of Benefits

    React Native for Android offers significant advantages, such as reduced development time, code reuse, and access to a vast community. Its robust capabilities enable you to build high-quality, performant apps efficiently.

    Encouragement to Get Started

    Kickstart your Android app development project by setting up your environment and diving into your first React Native project. Utilise the plethora of available learning resources and become part of the thriving React Native community to maximise your development skills.

    Discover more and get started with official resources at React Native Official Docs, and enhance your learning with tutorials such as this YouTube Tutorial and How to Build a React Native App: A Comprehensive Guide.

    Additional Resources

    For further exploration and deeper understanding, check out:

    These resources offer comprehensive tutorials and courses to help you learn more about React Native and start building your own Android apps with confidence.

    Call to Action: Join the React Native Community

    Starter Kit or Course Invitation

    Download a React Native starter kit or enrol in a dedicated course to accelerate your learning curve and start building powerful Android apps today.

    Engagement Encouragement

    We encourage you to share your React Native projects and experiences. Engage with the community through comments, forums, or social media to seek feedback and learn from fellow developers.

    Join us on this exciting journey and start creating your own innovative Android apps using React Native!

    Frequently Asked Questions


    1. How much does it typically cost to develop a mobile app?

    The cost can range from $5,000 for a simple app to over $300,000 for a highly complex app, depending on various factors like design complexity, features, and development platform.